
Community Groups
Establishing vibrant community groups is fundamental to encouraging active engagement and collaboration among members in the realm of online community management. As an administrator with distinct privileges, your role is crucial in initiating and overseeing these community-specific features. This guide will comprehensively walk you through creating and managing community groups to enhance member interaction.
Creating community groups
v2 community groups
Access the Community Groups Editor in the Site admin by locating and selecting Community under the content section of the site admin. Select New Group at the top of the page to create a new group.
Assign a title to your group (up to 90 characters).
The slug, derived from the title, is automatically generated (maximum 90 characters).
Once you've entered the required information, select Create to complete the initial setup of your group.
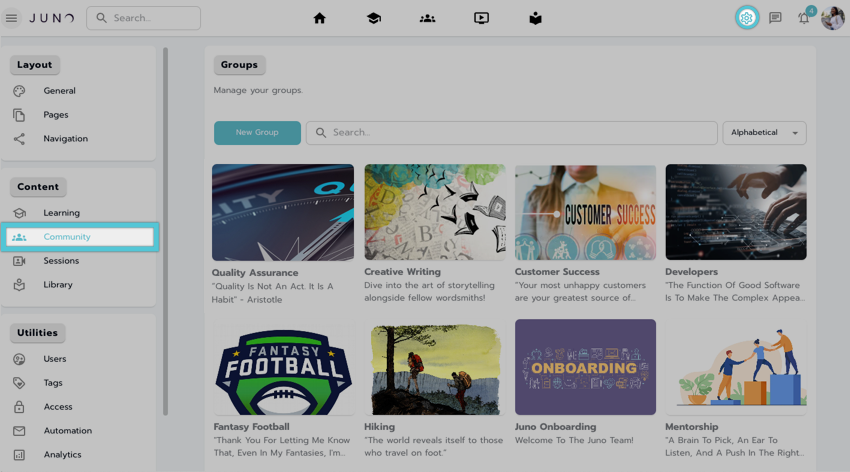
Locating the Community Group editor from the site admin dashboard in v2.
v1 community groups
To create a new community group, access the Group Editor from the Group Catalog page or the Community section under Content in the Site Admin. Select Create a Group at the top of the page.
Assign a title to your group (up to 90 characters).
The slug, derived from the title, is automatically generated (maximum 90 characters).
Once you've entered the required information, select Save to complete the initial setup of your group.

Creating a Group from the Group Catalog page in v1.
Accessing and managing groups
You can access and manage individual groups by selecting the Group Editor from the Group Catalog page or within any Group page. Alternatively, choose the specific group you want to edit directly from the admin interface.
Editable fields and sections on the Group Information tab include:
Title: Provide a descriptive title for your group (up to 90 characters).
Slug: This is a unique URL-friendly identifier for the group (limited to 50 characters, no spaces, special characters, or capital letters).
Preview Text: Briefly describe the group (78 characters max).
Body: The main content or description of the group, supporting text, lists, images, videos, and links.
Release Date: Specify when the group should become visible.
End Date: Set the date and time when the group should no longer be active.
List Image: The recommended size is 800 x 450 px for display in rotators, grids, or list modules.
Banner Image: The recommended size is 1440 × 461 px for prominent display on the group's page.
Tags: Add relevant tags to categorize your group.
Admins: Designate group administrators.
Delete Group: you can also delete the group on this page as well

Adding content to the Group Information page.
Ensure you select the SAVE button that will populate in the right-hand corner once any changes have been made to save them.

The save or discard buttons.
Adding and managing group members
Manage and Add members from the Members tab
Select the Members tab inside from within the Group Editor.
Search for current members using the Search Members bar.
Manage current members using the X icon to the right of each member's name.
Add members using the Add Members button located to the right of the search members bar.
Search for users using the search bar in the Add Group Members popup.
Once located, use the Add button listed to the right of each user to add or invite them to the group.

Adding and managing group members on the Members tab.
Private group member management
Individuals can request membership in private groups. To oversee these requests, go to the Members tab in either the Group editor or admin dashboard.

Requesting to join a private group.
Within this tab, you'll find a selectable link labeled Pending Members (#) whenever there are pending requests.
Selecting Pending Members allows you to approve or deny each request individually.

Managing members in a private group.
Uploading and managing files
Upload or manage files from the Files tab:
You can upload any file type to a group by navigating to the group’s Files tab and using the Upload button at the top left.
All group members can upload and download any file from the files tab.
Upload one or many files simultaneously using the drag-and-drop function or selecting them from within your file locator.
You can update the file name and add a description for each file through the file uploader.

Uploading Files to the Groups File Library.
Utilize the Search bar to locate files by name or file type.
Download files using the Download Icon that appears when hovering over each file.

Viewing and interacting with the File Library.
Site and Group admins can manage uploaded files through the Group Editor or in Das admin.
Delete or Download files using the three-dot more icon when hovering over each file.

Managing files in the file library from the Group Editor.
Additional settings
In the additional settings tab, you can control various aspects such as member privileges, tab visibility, and tab arrangement within your group.
Enable or disable forum topic creation:
Toggle the Allow members to post new forum topics switch to permit or restrict members from creating and posting new forum topics (defaults to off).
Manage tab visibility
Use the Eye icon to the right of each tab to select which tabs are visible to your members. Selecting the eye icon removes the tab's visibility for all members (defaults to visible).
Customize Tab Order
The About tab is fixed as the landing tab. You can reorder all other tabs by dragging and dropping them using the icon on the far right of each tab. The order goes from left (top-listed tab) to right (bottom-listed tab).

Managing group settings from the Additional Settings tab.