Skip table of contents

Creating custom email campaigns

This step-by-step walkthrough will help you navigate the Emailer Tool, providing detailed instructions on creating, scheduling, and activating email campaigns.

Navigation

  1. From your Main Site, access the Admin Dashboard from the More menu.

  2. Inside the admin dashboard, navigate to the Automation Tool using the left-side navigation.

  3. Select the Emailer Tool: a suite designed for setting up automated email campaigns.

Email campaign management

Create and manage your email campaigns through the Emailer tool's functional Tabs
(ALL, ACTIVE, DRAFT, COMPLETED) and +NEW CAMPAIGN button to enhance and manage your communication campaigns.

2024-02-13_11-49-47.png

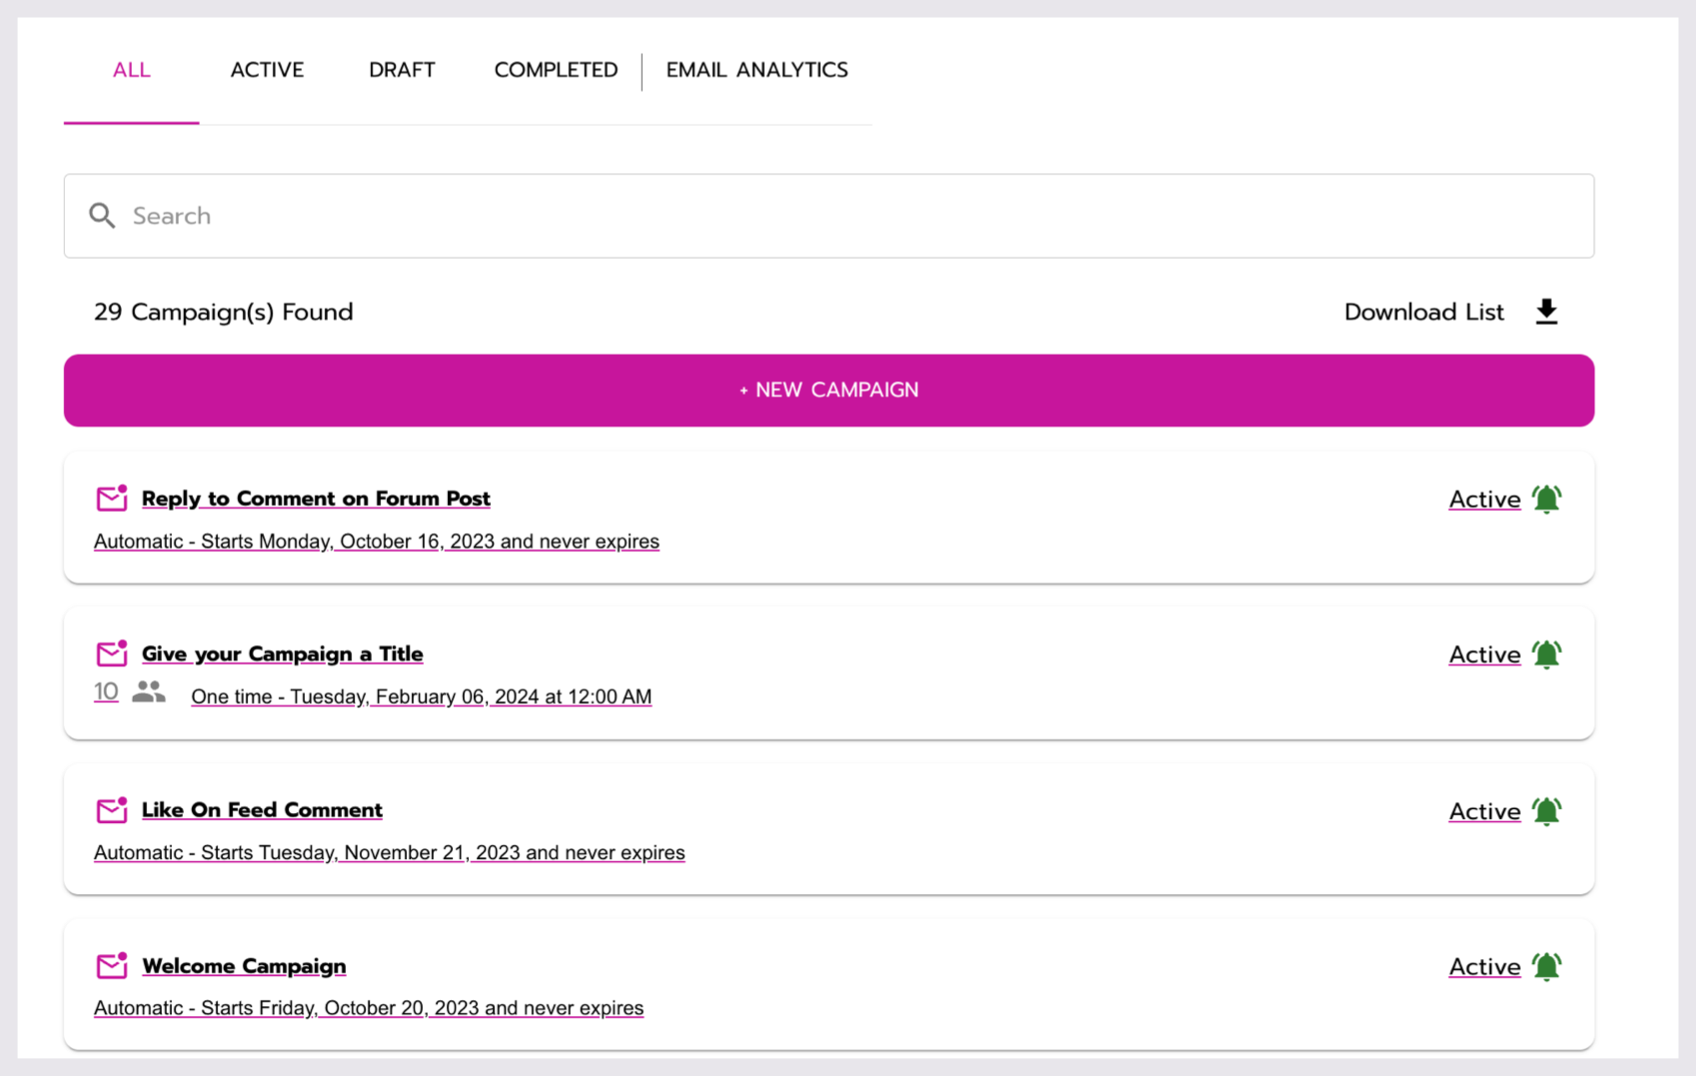
Viewing the ALL tab in the Emailer tool.

Creating a new campaign

  1. Select +NEW CAMPAIGN.

  2. Provide a Title for your Campaign in the Campaign Title field (254 char limit).

  3. Choose Custom from the campaign type dropdown.

  4. Select +CREATE NEW CAMPAIGN.

  5. Locate and select your newly created campaign from the campaign list.

2024-02-06_03-56-18.png

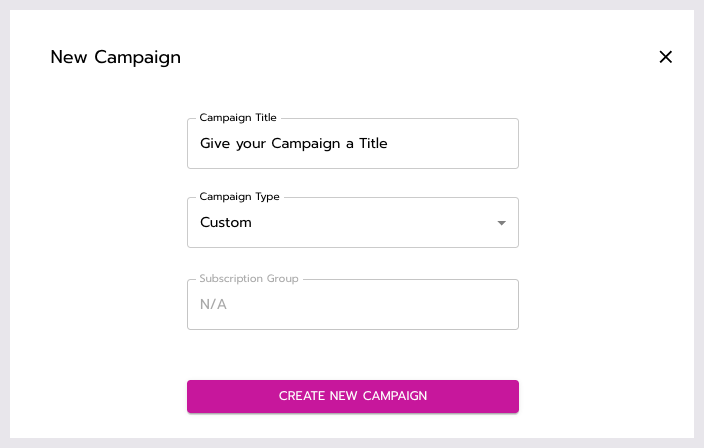
Creating a new email campaign.

Campaign Builder Sections

New Campaign

  • You can edit the Campaign Title (254 char limit).

  • Assign a From Name (254 Char limit) and From Email (48 Char limit) for the sender.

Explore best practices for selecting appropriate Names and From Emails to maximize email deliverability and prevent messages from landing in recipients' junk folders..

  • Craft a Subject line (254 Char limit) for your email campaign.

2024-02-06_03-58-04.png

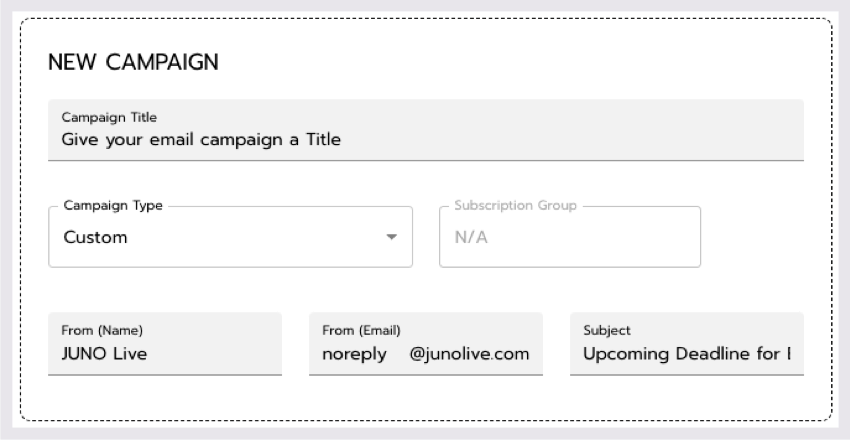
Setting up the New Campaign section.

Campaign schedule

  • Choose from frequency options: One Time, Daily, Weekly, and Monthly.

  • Customize the schedule details based on the selected frequency (see the table below).

2024-02-06_03-59-42.png

Customing the Campaign Schedule section.

Email fequency table

Reoccurance

Example/use cases

Additional Options

One Time

Ensures the email is sent only once, at a set date and time.

Ideal for single, time-sensitive communications like special announcements or event reminders.

Guarantees the message won't repeat after delivery, serving as a standalone communication

  • Date and Time:

Specify the exact date and time when the one-time email should be sent.

Daily

Guarantees daily email delivery at the designated time.

Effectively provides regular updates, daily reminders, or time-sensitive information.

Opt for this frequency to establish a consistent and daily communication schedule, ensuring your audience stays engaged with timely content.

  • Start Date:

Define when the daily campaign should begin.

  • Never Expires (Toggle):

Decide whether the campaign should run indefinitely or have an end date.

  • End Date (if applicable):

Set an end date if the campaign should stop after a specific period.

  • Time:

Specify the time of day for daily emails.

Daily (with End Date)

Useful for temporary campaigns like limited-time promotions or specific events.

Ensures emails cease after the defined period, preventing the campaign from persisting indefinitely.

  • Start Date:

Define when the daily campaign should begin.

  • End Date:

Set a specific end date for the daily campaign.

  • Time:

Specify the time of day for daily emails.

Weekly

Sends emails on a chosen day of the week.

Ideal if you are seeking a less frequent but regular communication schedule, it is well-suited for weekly newsletters, updates, or promotions tailored to a specific day.

Guarantees the campaign's success by confirming that weekly emails consistently reach your audience on the chosen day.

  • Start Date:

Specify when the weekly campaign should begin.

  • Never Expires (Toggle):

Decide whether the campaign should run indefinitely or have an end date.

  • End Date (if applicable):

Set an end date if the campaign should stop after a specific period.

  • Day:

Choose the specific day of the week for sending emails.

  • Time:

Specify the time of day for weekly emails.

Monthly

The Monthly frequency, gives you two toggle choices:

The first option enables setting up a campaign to send on a specific day of the week in a chosen week of the month—beneficial for events or announcements planned for specific weeks.

The second option allows you to send emails on a specific day of the month, ideal for monthly updates or promotions tied to a particular date.

Both options ensure accurate delivery based on the specified settings, and you can customize these campaigns to align with your content and marketing strategy.

  • Start Date:

Specify when the monthly campaign should begin.

  • Never Expires (Toggle):

Decide whether the campaign should run indefinitely or have an end date.

  • End Date (if applicable):

Set an end date if the campaign should stop after a specific period.

  • For the first toggle choice:

    • Week: Choose 1st, 2nd, 3rd, or 4th week of the month.

    • Day: Choose the specific day of the week for sending emails.

    • Time: Specify the time of day.

  • For the second toggle choice:

    • Date: Choose the specific day of the month.

    • Time: Specify the time of day.

Campaign Recipients

  • Utilize your site's declared Tags to calculate projected recipients.

  • Toggle between ANY and ALL options to determine tag consideration.

ANY: Users can have any of the tags listed to receive the email

ALL: Users must have all tags listed to receive the email

2024-02-06_04-03-37.png

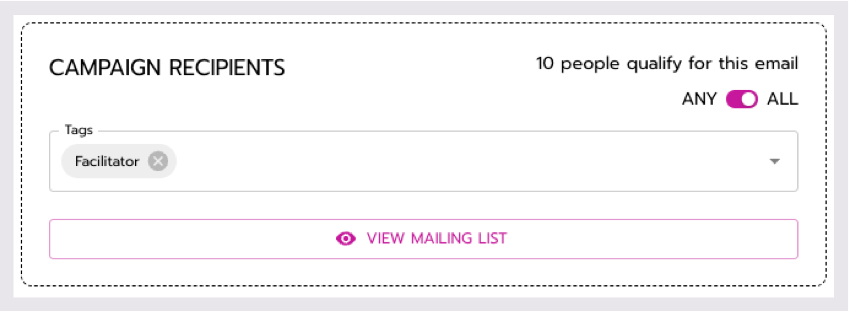
Creating the Campaign's Mailing list.

Email Templates

Take a look at our email template designs and contact your Client Success Manager (CSM) to set up templates for your site.

Templates will be accessible in the site admin dashboard soon! Check back later for updates.

Send Test Email

Test the email by entering recipient emails and selecting Send Test Now (separate multiple emails with commas).

Save and Activate

  • Save the email campaign using the Save button at the top of the campaign builder

You must save the campaign prior to activating it.

2024-02-06_04-11-29.png

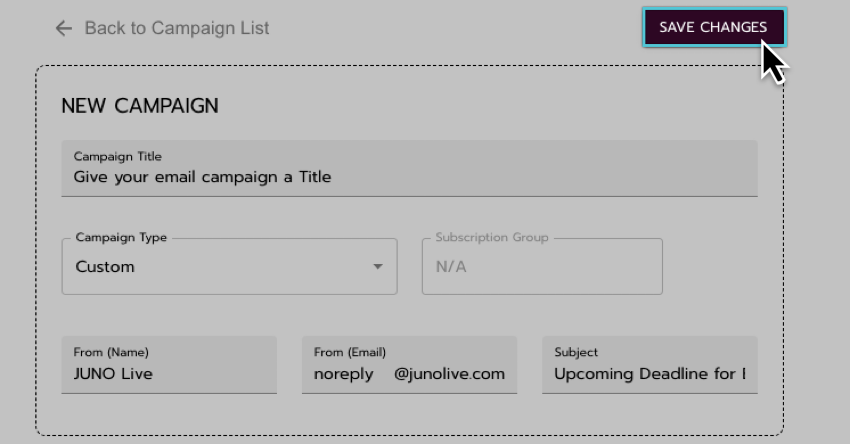
Saving the changes to the New Campaign.

  • Double-check that all the information for the campaign is correct using the right-hand side campaign preview, and activate the email campaign using the Activate button at the top right of the campaign preview.

2024-02-06_04-06-51.png

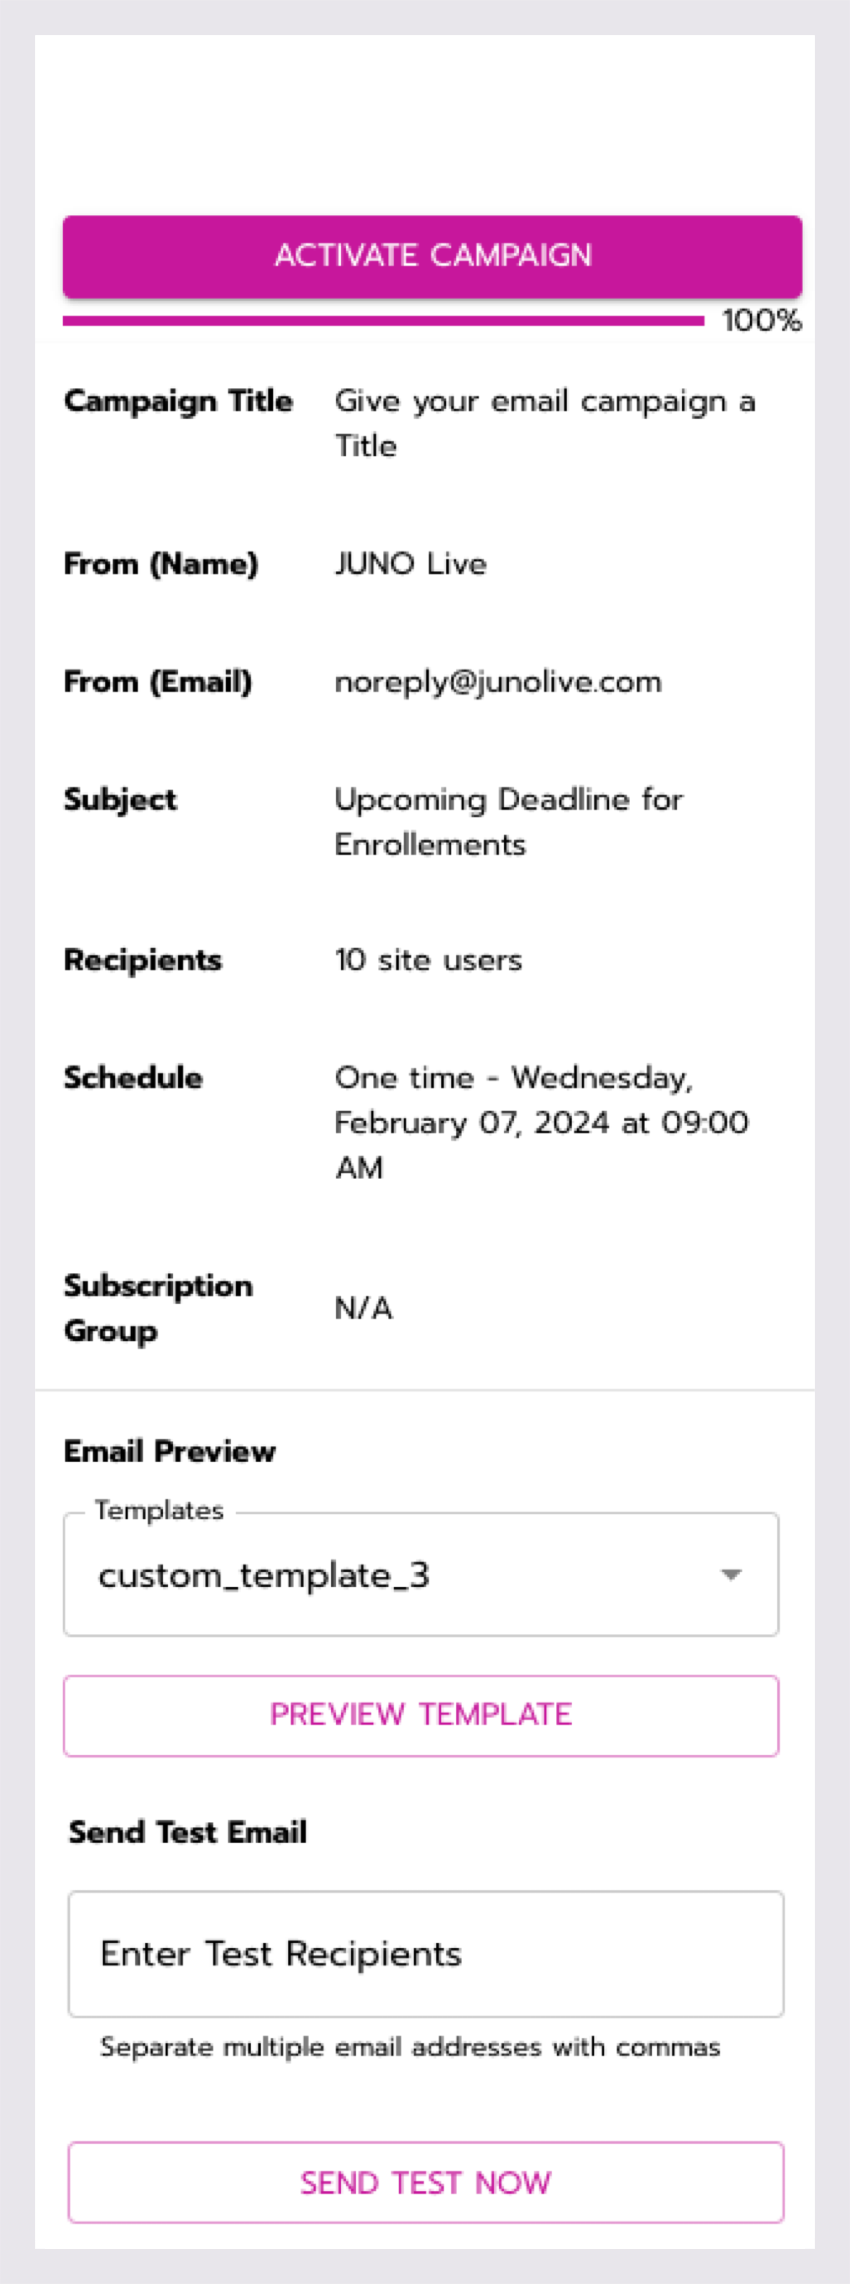
The right-hand side Campaign Preview.

JavaScript errors detected

Please note, these errors can depend on your browser setup.

If this problem persists, please contact our support.