
Getting started for exhibitors
Get the most out of your exhibitor networking experience! This guide helps you set your exhibitor engagement suite up for success and learn how to connect directly with visitors.
For more in-depth training, see our detailed guides to using the exhibitor suite editor. Your JUNO team will also share a recording of your live training session.
Follow these steps:![]() Prep your content
Prep your content![]() Set up your personal profile
Set up your personal profile![]() Get to know the suite editor
Get to know the suite editor![]() Set up your suite
Set up your suite![]() Connect with attendees
Connect with attendees
Prep your content
You’ll get early access to the site to set up. But you can also gather content for your exhibitor suite ahead of time! We suggest:
Write an informative introduction about your organization.
Write short, personalized greetings for targeted visitors.
Come up with polls and questions for visitors.
Gather links to your social media accounts and online store products.
Gather contact information for representatives from your team who’ll be added to your suite.
Set up your personal profile
After logging in, edit your personal information. Select the Profile icon in the navigation bar, then My Information to go to your profile. Each representative from your team will do this too. Later, you can connect everyone’s profiles to your exhibitor suite. We suggest:
Upload your Avatar.
Pick a photo you’d be happy to greet people with.Set your availability.
Visitors can schedule meetings with you during this time. You can also add specific dates and times that you’ll be away. Don’t worry about time zones! It automatically adjusts to your local time. We also prevent double-booking by automatically blocking your calendar when you schedule sessions or meetings.Allow personal contact.
Turn on Allow members to contact me to let people contact you through your personal profile. They can send direct messages and schedule meetings.Test your audio and video setup.
Click the link to go to the testing page. We recommend using Google Chrome. If you’re using a VPN, you may need to disconnect it during video calls and sessions for the best experience.Don’t forget to click Save.
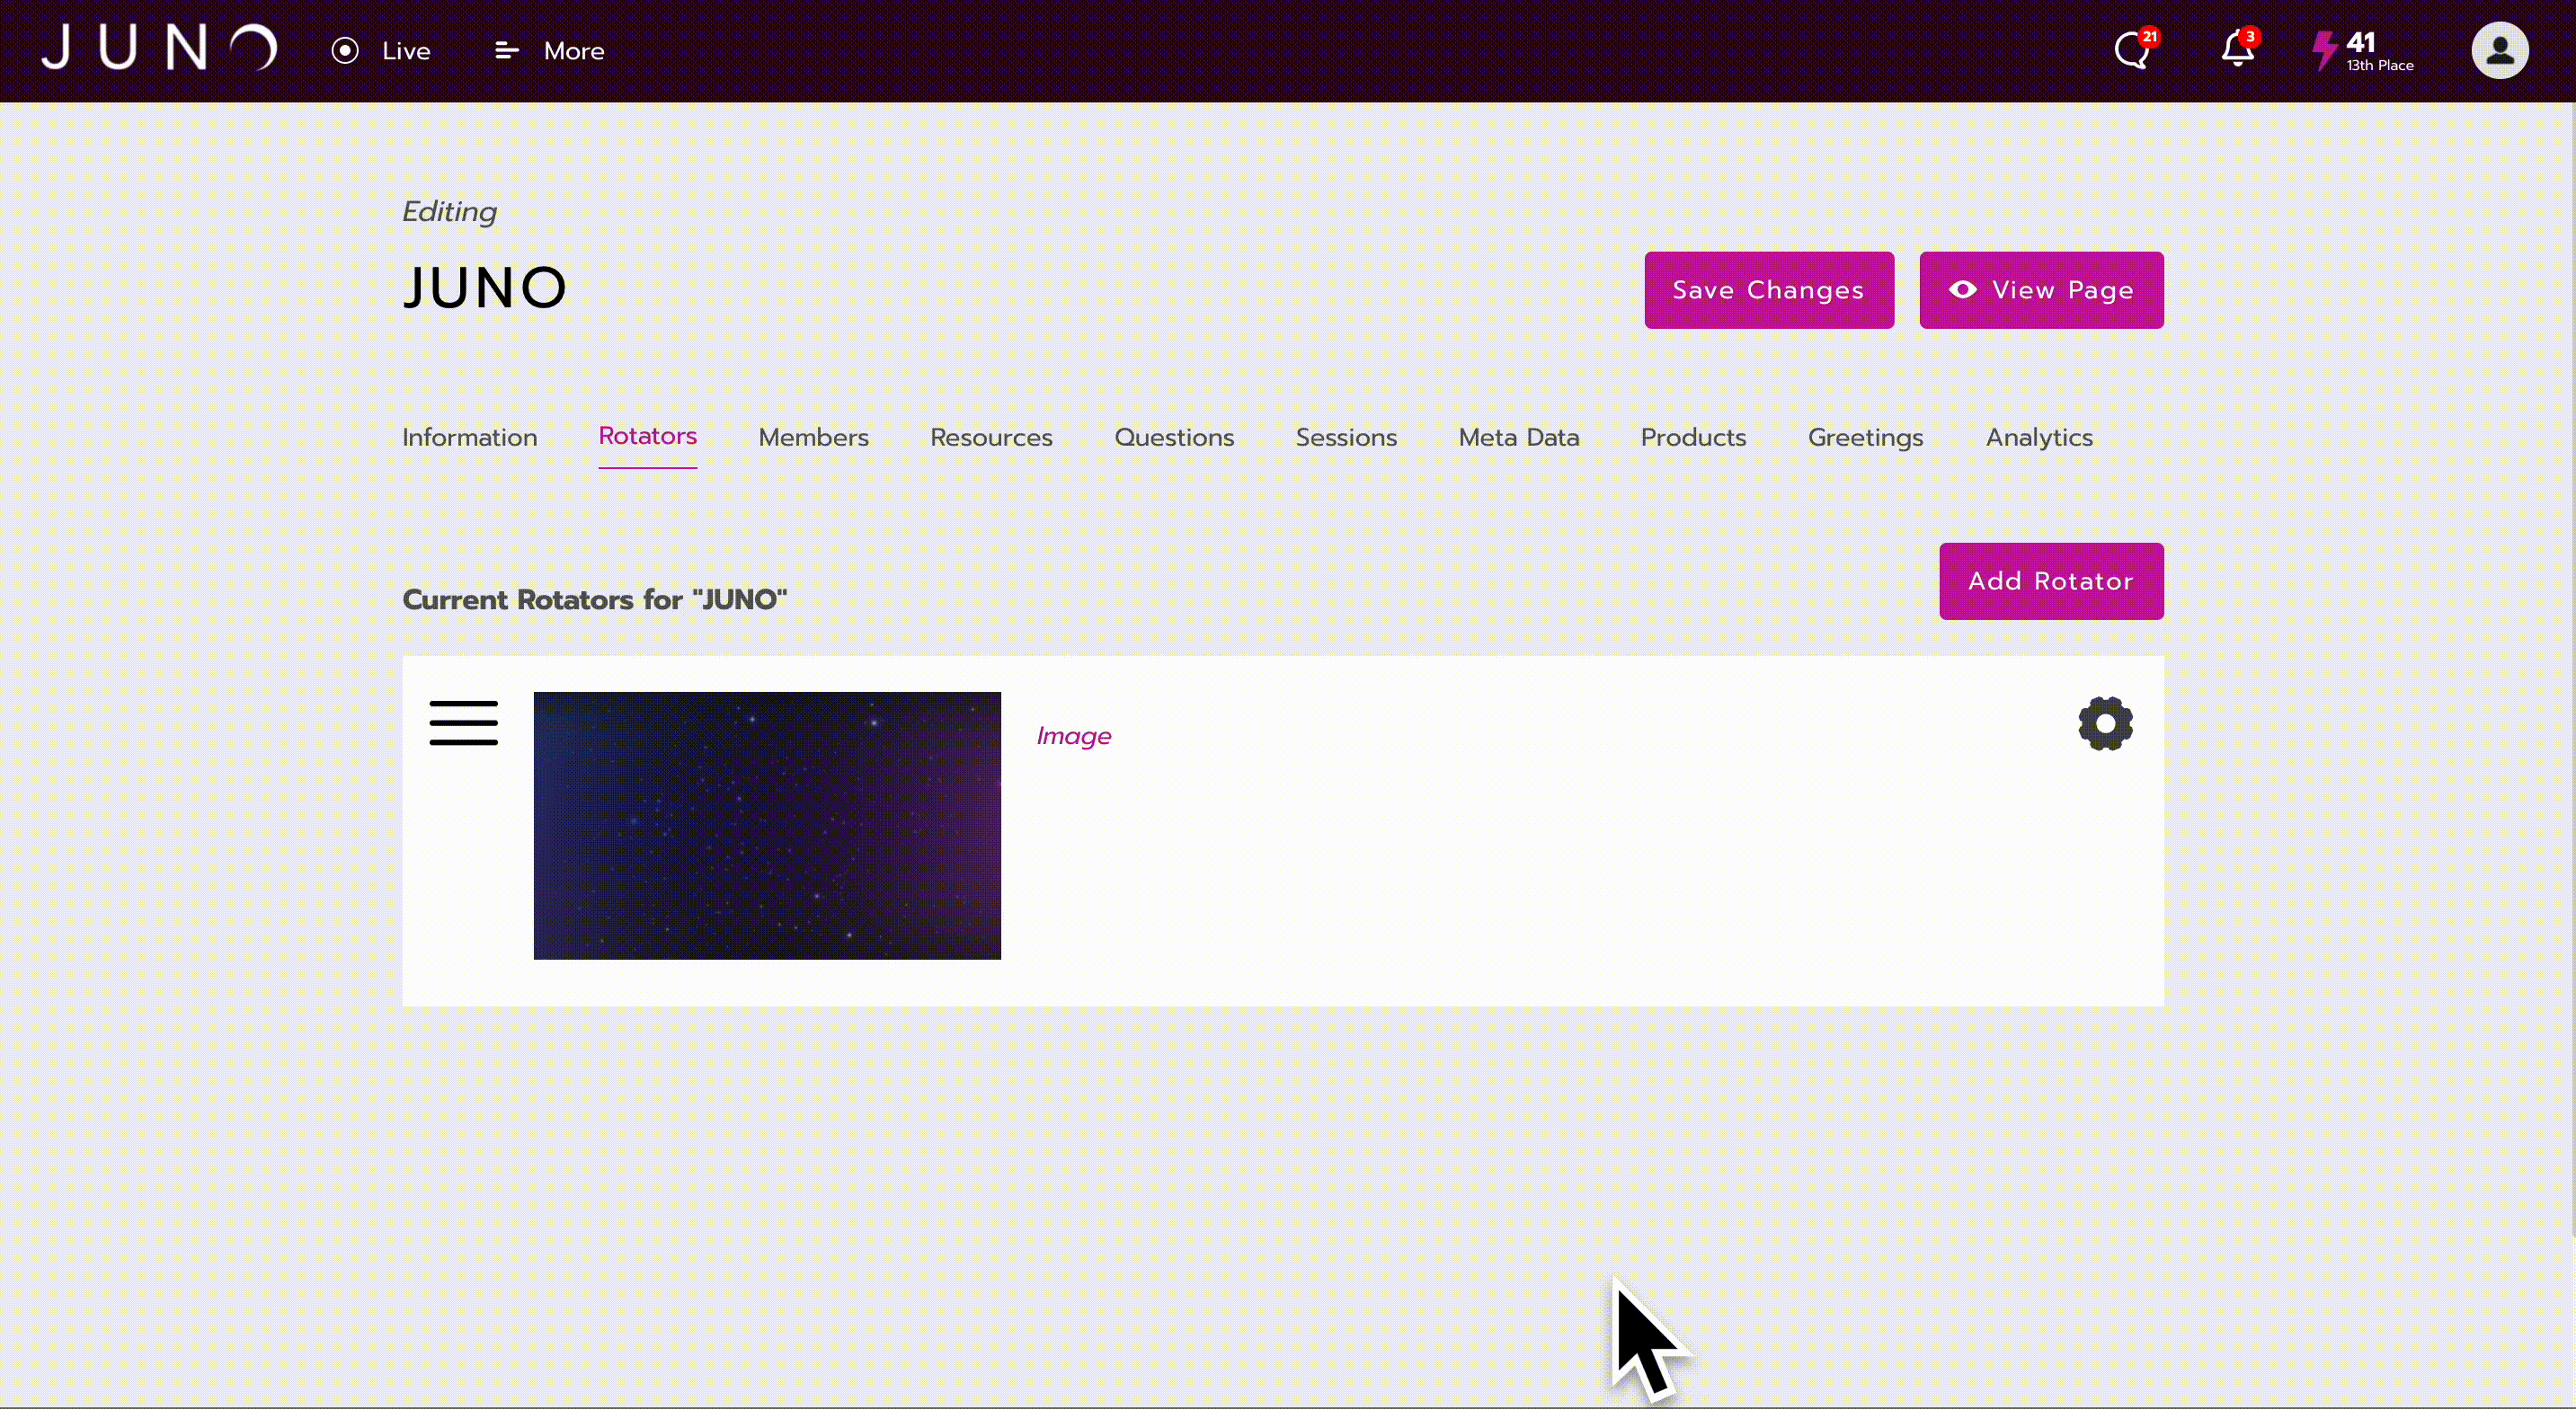
Get to know the suite editor
The JUNO team will email you a direct link to your exhibitor suite. Otherwise, to find your suite on the site:
Go to the Exhibitors section in the navigation bar. This might have a custom name like Exhibit Hall.
Find your organization’s name. This is your suite! Click to enter it.
Scroll down the page and click the Edit button to enter the suite editor.
The editor is organized into multiple tabs for different types of content. In general, to use the editor:
Click the Add button to add a piece of content to a tab.
In the pop-up window, fill in text and upload files and images.
Click Save Changes at the bottom of the pop-up window.
Rearrange content in a tab by clicking and dragging the 3 lines icon. Or click the Gear icon to edit it.
When you’re done making all changes in a tab, click Save Changes at the top of the page. Otherwise, you’ll lose your work.
Click View Page to see the changes in your suite.
Need more help using the editor? See our detailed guides for each tab.
Set up your suite
Make your exhibitor suite unique to you and engaging for visitors! Use this diagram to see where content shows up in your suite once you add it to the editor. Go to the table below for more details.
Note that the Edit button and Analytics are only visible to admins, like you. Visitors don’t see them!
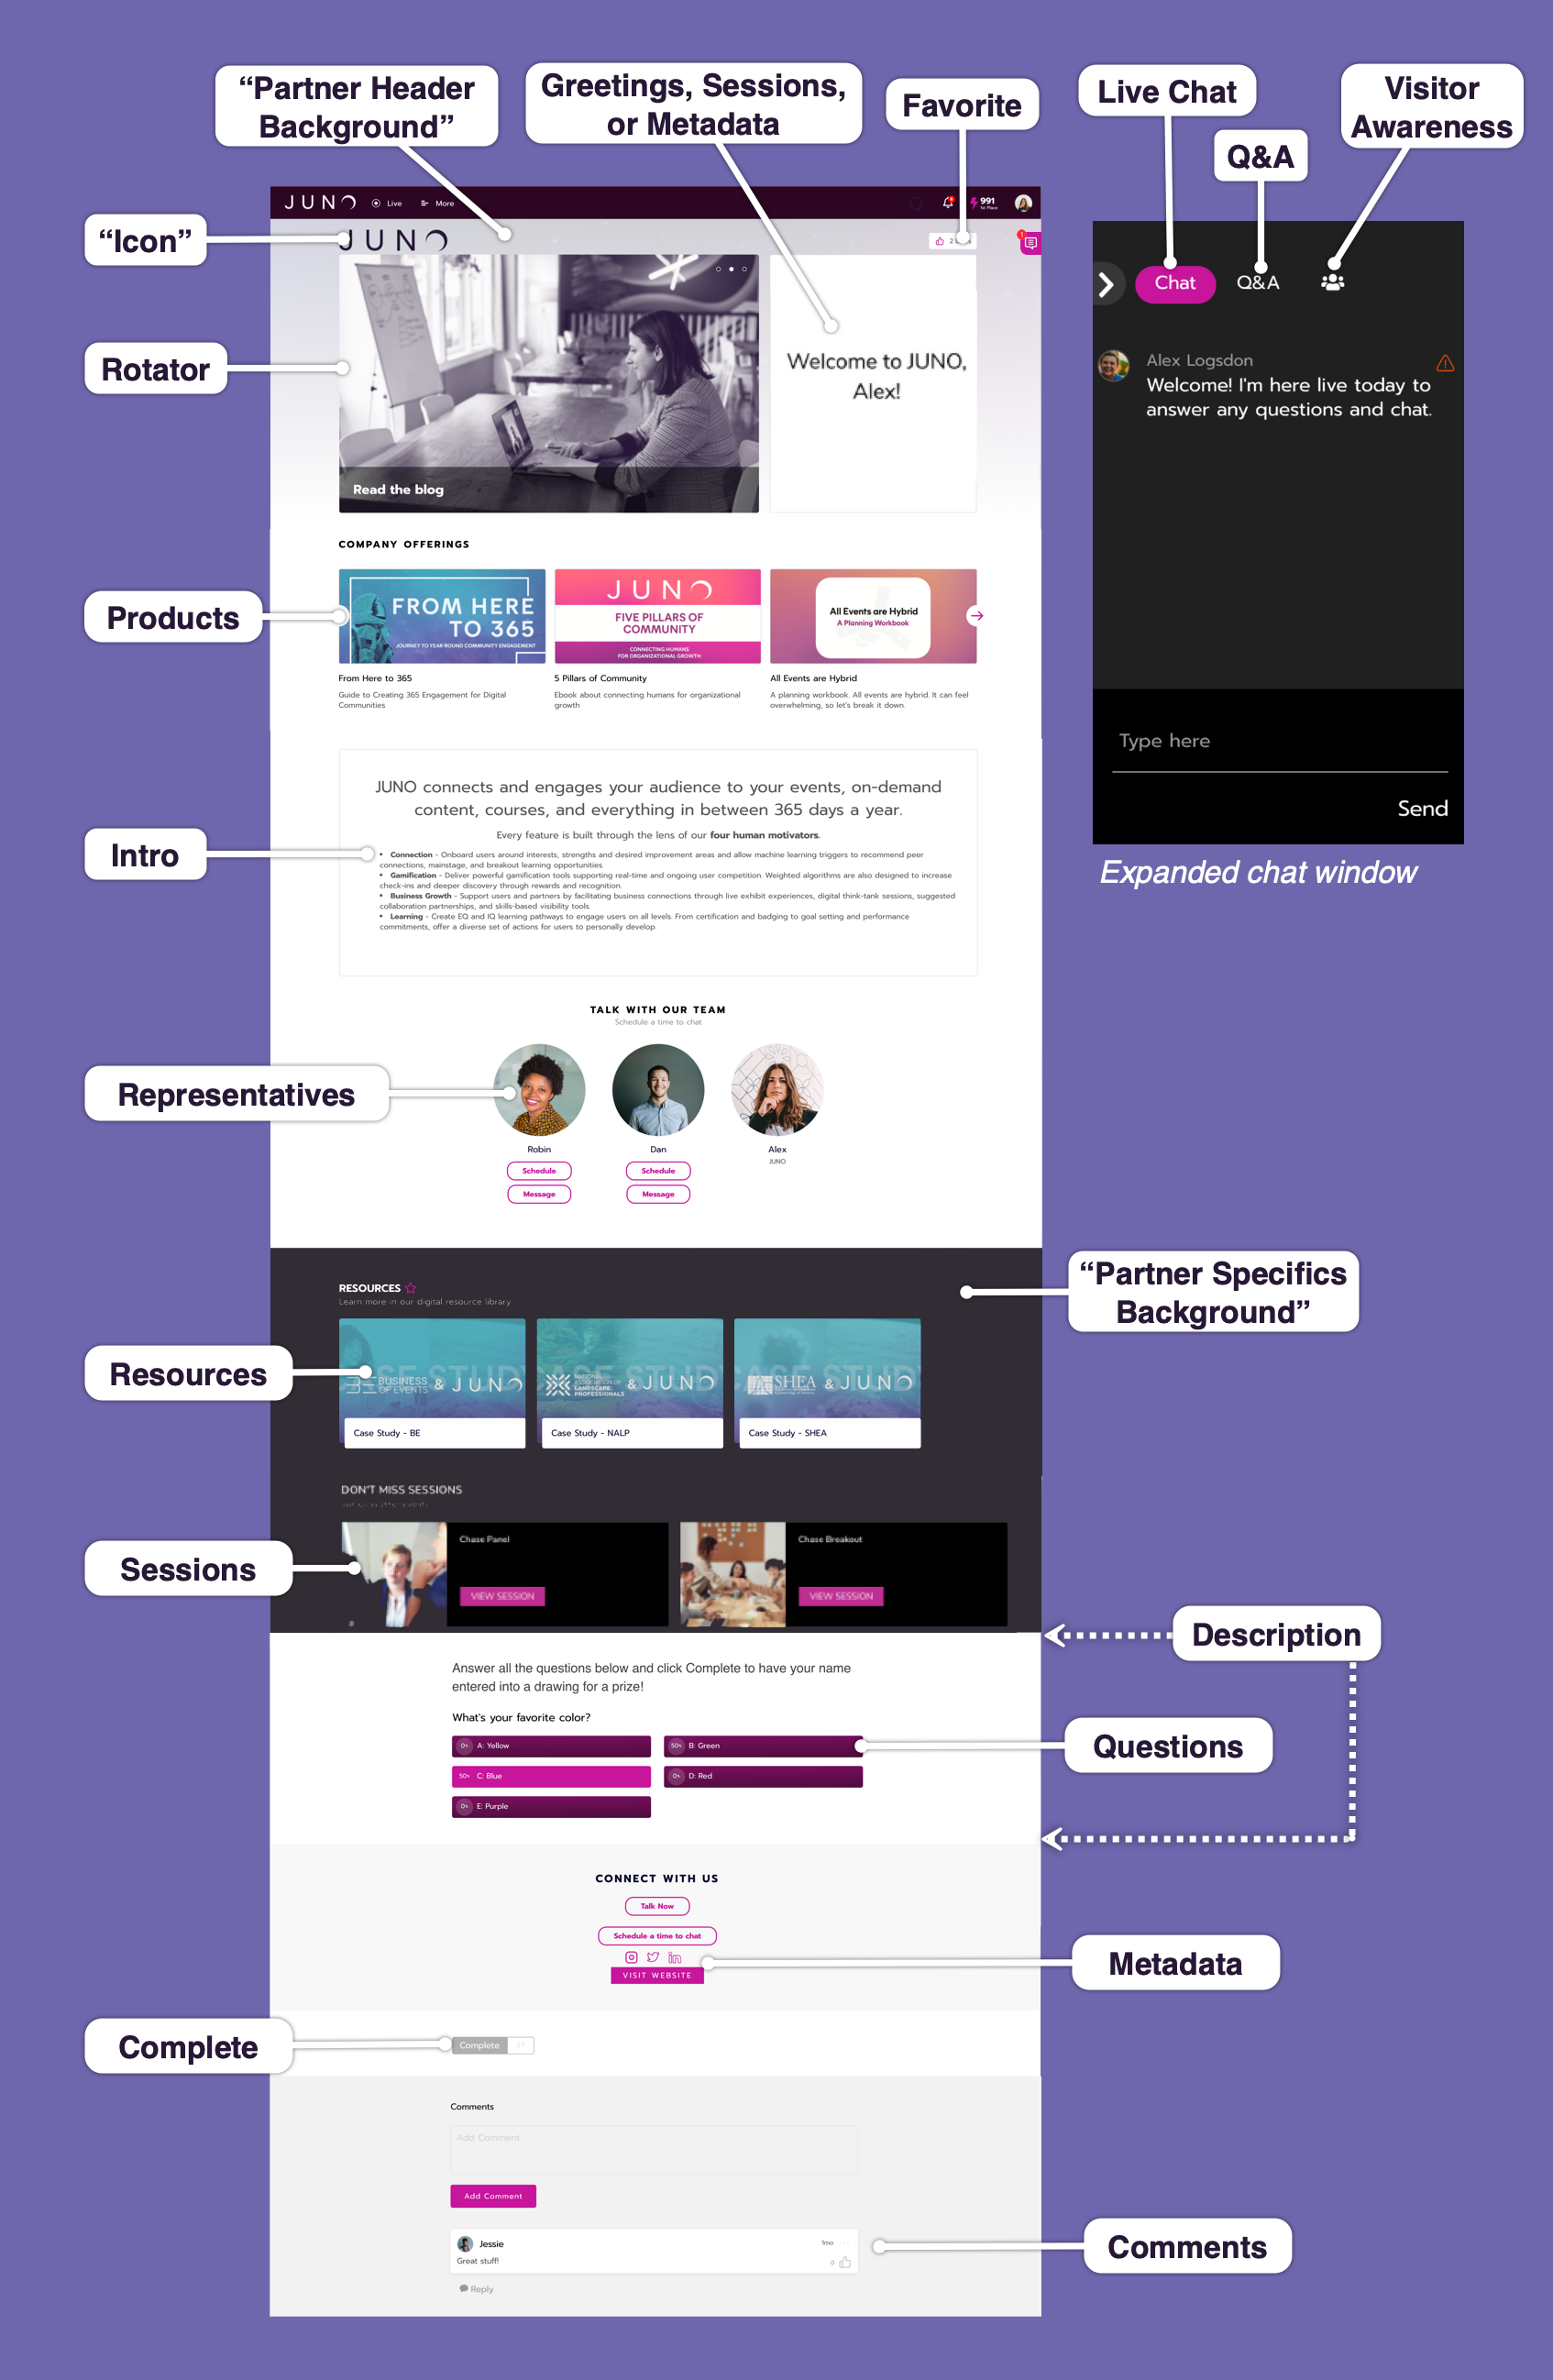
Elements of your suite (click to enlarge)
Tab in the editor | Content |
|---|---|
Information |
Always keep the Status button Active. If you deactivate it, you won’t be able to find your suite on the site. Tip: Save the page URL to get back in in case your suite is accidentally deactivated. |
Rotators | Add featured images and videos to a rotator at the top. See specifications. |
Representatives |
|
Resources | Add downloadable files or images. These do not include videos or links to other sites. See specifications. Make sure Allow download is turned on in the Information tab. |
Questions | Add polls and different types of questions for visitors to answer. Questions are a two-step process. After creating one in the Questions tab, go to the Information tab and insert the question in the Description box. Then, it will show up in your suite. |
Metadata | Add your organization’s contact information and social media links. |
Sessions | Sessions you sponsor are advertised in your suite. |
Products | Add products that link to your online store. |
Greetings | Add personalized greetings only targeted visitors can see. We suggest using this feature to target leads. The optional Generic Greeting is seen by all other visitors. |
Analytics | View stats about your visitors and download analytics. Visitors are labeled Anonymous if they turn on privacy settings. Only representatives from your team with admin access can see this tab. |
Need more help using the editor? See our detailed guides for each tab.
Connect with attendees
Connections happen in a few ways. Try all of them!
Set up your exhibitor suite to maximize connections.
Turn on Live Chat to connect directly with visitors in a group chat.
Turn on Visitor Awareness so that you can see who’s in your suite right now.
Turn on Comments, the Favorite button, and the Complete button.
Add personalized greetings.
Add your organization’s social media links.
Coordinate your representatives' schedules so someone is always available to chat.
Directly reach out to visitors.
Start conversations in your group chat. Invite visitors to participate!
Click any visitor's profile photo to schedule a meeting or send a direct message.
Outside your suite, find attendees in the Directory or around the site.
Use the tags on attendees' personal profiles to understand their interests and identify leads.
Respond to visitors who set up a chat.
When visitors click the Talk now button in your suite, you can accept their call and enter a private breakout room.
When visitors click the Schedule button in your suite, they pick a time on your calendar. You get a notification by email and directly on the site, then you add it to your schedule.
Outside your suite, people can send messages or schedule meetings through your personal profile. Make sure to turn on Allow members to contact me in your profile.
You can invite more people to any meeting.