
Download session recordings and create on-demand content
You can download recordings of live sessions and upload them to an on-demand content page. Then, your users can watch them at any time. You can also use the downloaded recording outside of your JUNO site.
|
Learn about which sessions are recorded and what they include. |
1. Download archived recordings
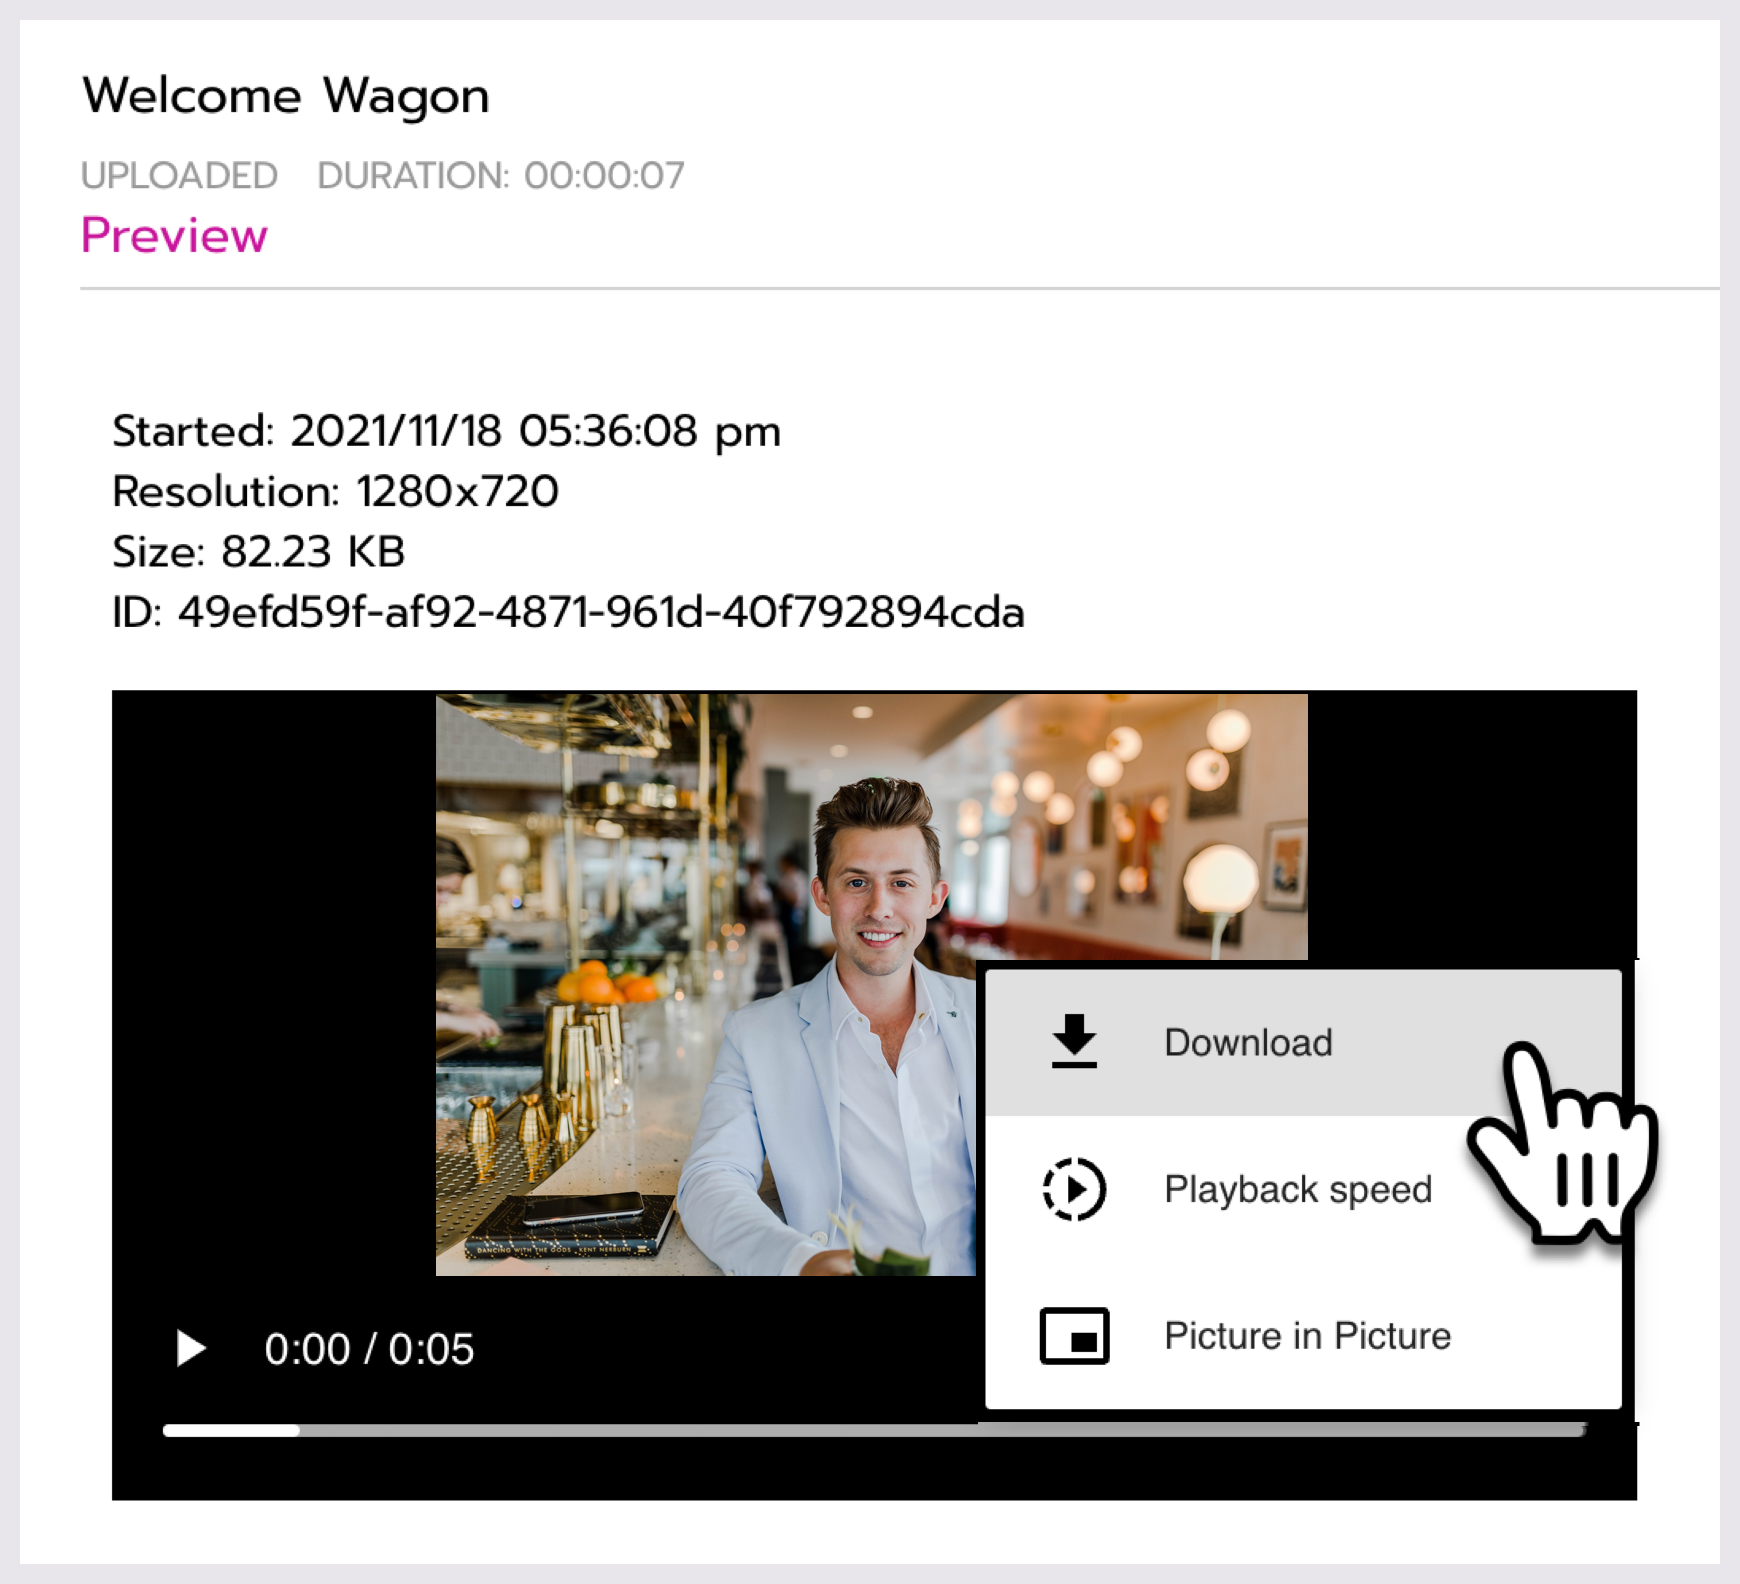
When a session ends, the recording is available to download at the bottom of the session page. Only site admins can see it.
If a session was streamed in with Amazon IVS, you cannot download it directly from the session page. Instead, see the special instructions below.
It may take up to an hour for the recording to appear, depending on the length of the session.

To download a recording:
Go to the session page by clicking the session link in your run of show spreadsheet. You can also find it on your site if you chose to display past sessions in a module and/or schedule.
Scroll down to Archives.
If you don’t see the recording, try clicking Refresh.
Click Preview.
Click the 3 dots menu in the video window.
Select Download.
Get recordings for Amazon IVS streamed-in sessions
Sessions streamed in with Amazon IVS are not recorded by default but can be requested ahead of time. Before or during session setup, tell your JUNO team that you’d like these sessions to be recorded.
If a session is streamed in with Amazon IVS, you can get a recording of the session. Instead of downloading it from the session page yourself, the JUNO team provides you with an M3U8 link. It looks something like this:
https://d165wtk1g184j.cloudfront.net/ivs/v1/00690743842/DZBDXV5ACiq/2022/2/20/19/54/VSudS1QeBvTk/media/hls/master.m3u8.
Then you convert it to your file format of choice, usually MP4.
Need help converting the file? There are many ways to do it, but here’s a process that we recommend:
First, convert M3U8 to TS:
The JUNO team provides you with an M3U8 link. It looks something like this:
https://d165wtk1g184j.cloudfront.net/ivs/v1/00690743842/DZBDXV5ACiq/2022/2/20/19/54/VSudS1QeBvTk/media/hls/master.m3u8Add the HLS Downloader extension to Google Chrome.
Open the HLS Downloader extension.
Paste the M3U8 link at the top and select Add.
Wait for your video to process. It provides multiple versions of your video, at different resolutions.
Download the version(s) you want. We recommend 720p for web videos.
The downloaded file is in TS format.

Convert M3U8 to TS in the HLS Downloader extension.
Next, convert TS to MP4 (or your preferred format):
Download Handbrake, a video conversion software.
Upload your TS file by selecting Open Source in Handbrake.
Select a Destination where your video will be saved.
Select a Preset and Format. We like to use the Web > Vimeo YouTube 720p preset and MP4 format.
Select Start to convert your video. Wait for it to process.
Find the completed video in the location where you saved it.

Convert TS to MP4 in Handbrake.
2. Edit recordings
Edit the recording as needed. If the session had a pre-roll video that you’d like to include in the on-demand recording, you will need to stitch it together manually.
3. Choose a hosting option
Once you’re happy with your video, upload it to YouTube, Vimeo, Wistia, or Brightcove.
Check your video’s privacy settings to make sure attendees will be able to view your video. Also note that regional laws block some video platforms. Learn more about video privacy settings.
Or JUNO can host the video using Amazon IVS. In that case, you have two options:
If you plan to upload the video to the site yourself, keep it saved on your desktop.
If you are working with the JUNO team to import a large number of videos, upload them to a Dropbox. Then the JUNO team will transfer the videos to our system and provide a video link (m3u8) to use in the next step.
4. Add the video to an on-demand content page
There are two ways to add a video to JUNO: Use the front-end editor yourself or import it with the JUNO team’s help.
Add videos using the front-end editor
Create an on-demand content page using the site admin dashboard:
Add a video to the page using the on-demand content editor.
Import videos with JUNO’s help
The JUNO team will give you an importer spreadsheet that lists all the sessions you’re converting. They do this close to the start of your event to ensure that all session information is finalized.
You only need to add two pieces of information to these columns in the spreadsheet:
In the Video type column: Type
Vimeo,YouTube,Wistia,Brightcove, orAmazon IVSIn the Video ID column: Paste the full video URL. For example,
https://www.youtube.com/watch?v=0ZEjJ5JEgjA&t=2s. For Amazon IVS, this is the m3u8 link.
The rest of the information for each live session is already included in the importer. It will be automatically added to the on-demand content page. This information includes:
Session name
Abstract
Slug (
_libraryis automatically added to the end of every slug.)Image
Description (Including any links, text, images, or questions that you added to the description. Note that questions from the Q&A and Polls tabs in the chat window are not included.)
Release date
Tags
You can add or remove tags if you’d like. We recommend making sure they match the tags you’re using to organize your on-demand content.
In the example below, see how a session looks after it’s converted to on-demand content.
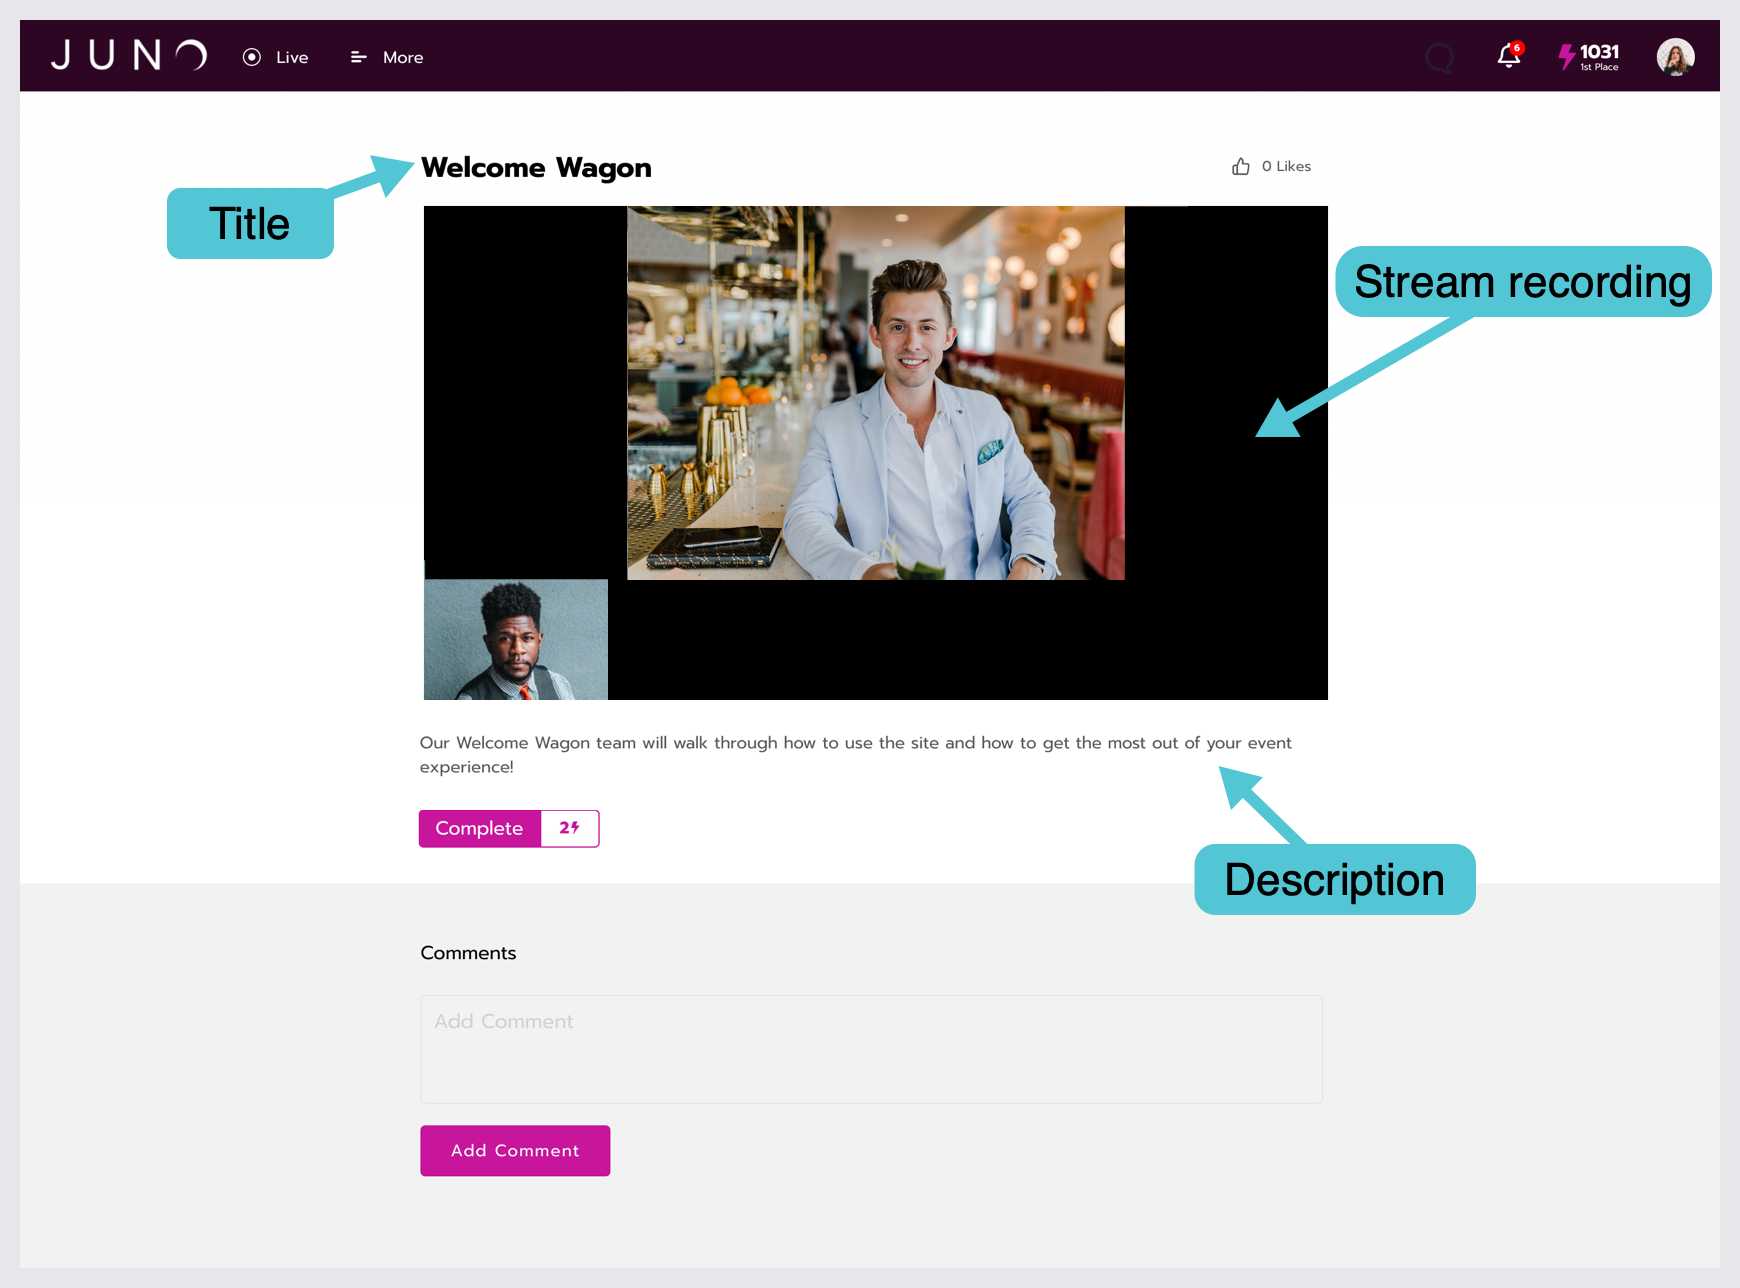
The final on-demand content page.