
Creating and managing Access Passes
This guide outlines configuring Access Passes, assigning products, and establishing price levels for e-commerce on your platform. These components work together to control access to site content and manage financial transactions through Stripe.
Connect your stripe account | Set up your price levels | Create access passes | Create and attach a product to an access pass | Granting users the access pass | Attach the access pass to content around the site
Prerequisites
A Stripe account with a publishable key and a secret key.
Administrative access to the Site Admin.
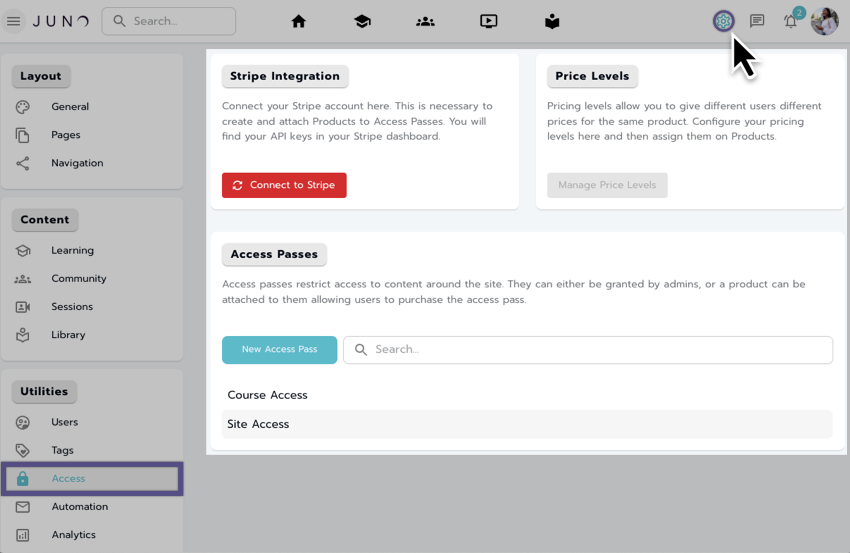
Accessing the Access section in the Site Admin.
Connect your stripe account
Log into the administrative portal.
Navigate to the Acess Passes section.
Select the red Connect to Stripe button
Enter your Stripe Publishable key and Secret key to connect your account.
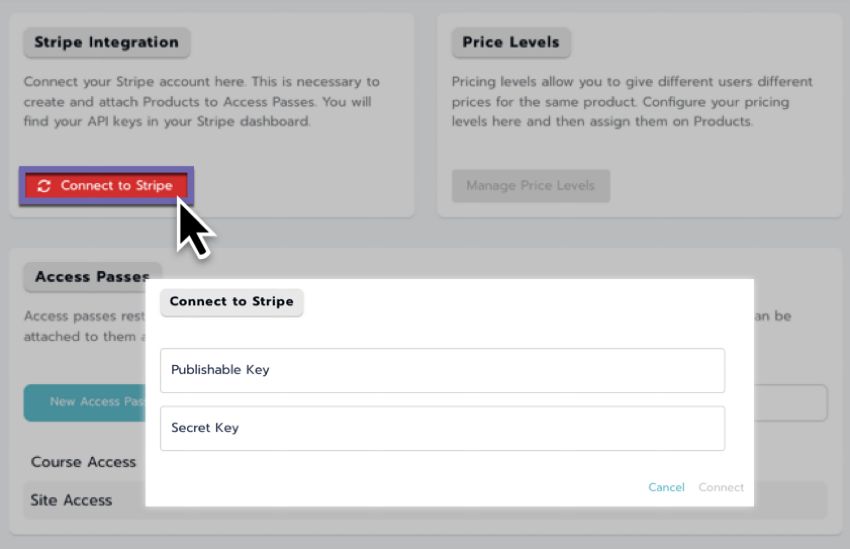
Stripe connection interface on the Site Admin.
Set up your price levels
Example use cases for price levels
Sell Tickets to an event
Scenario: You are holding a live event but want to offer your customers the option to purchase access to it virtually.
Price Level Implementation
Set the base price for an individual ticket.
Membership Tiers
Scenario: You can offer a membership to your site with multiple tiers, such as Bronze, Silver, and Gold. Each tier provides increasing levels of access and benefits.
Price level implementation
Set a Bronze price level for basic site access.
Create a Silver price level with basic access plus additional features or content.
Establish a Gold price level for full access to all site content and exclusive benefits.
Early Bird Pricing
Scenario: You want to incentivize early registrations for an upcoming event or course by offering a discounted rate.
Price level implementation
Create an Early Bird price level with a reduced rate available for a limited time.
After the promotion ends, set the Standard price level for regular registration.
Student Discounts
Scenario: Students are an important part of your audience, and you want to offer them a special rate for accessing educational content.
Price level implementation
Establish a General Access price level for the public.
Create a Student price level with a requirement for a valid student ID, offering a discount on the general rate.
Add-ons and Extras
Scenario: Your site offers a base product with optional add-ons or extras that customers can purchase for an enhanced experience.
Price level implementation
Define a Base Access price level for the standard offering.
Create separate price levels for each additional feature or extra that can be added to the base purchase.
Adding a pricing level
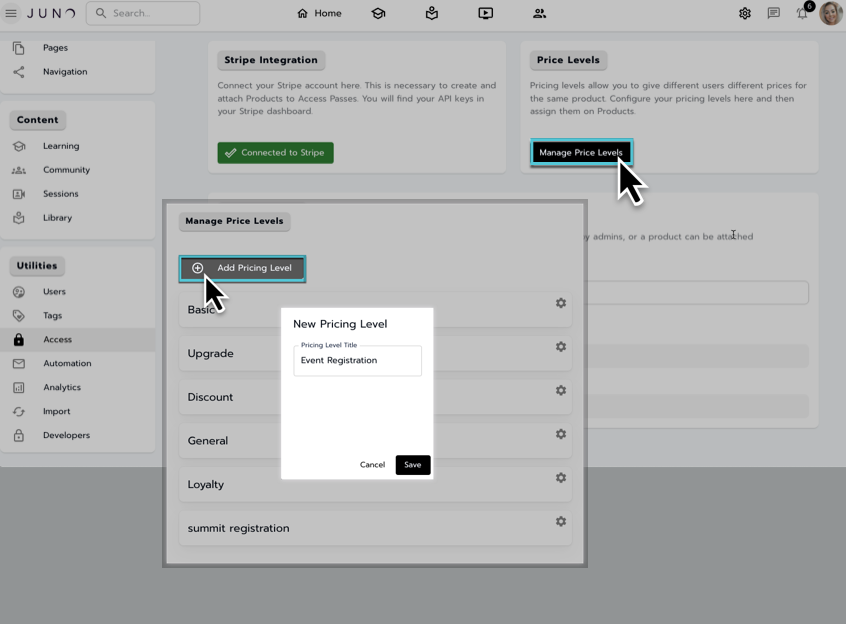
Creating a new Price Level.
Locate and select Manage Price Levels
In the Manage Price Levels window, select + Add Pricing Level.
Enter a name for your price level in the Pricing Level Title field.
Confirm the creation of the new price level by selecting Save.
Managing a price level
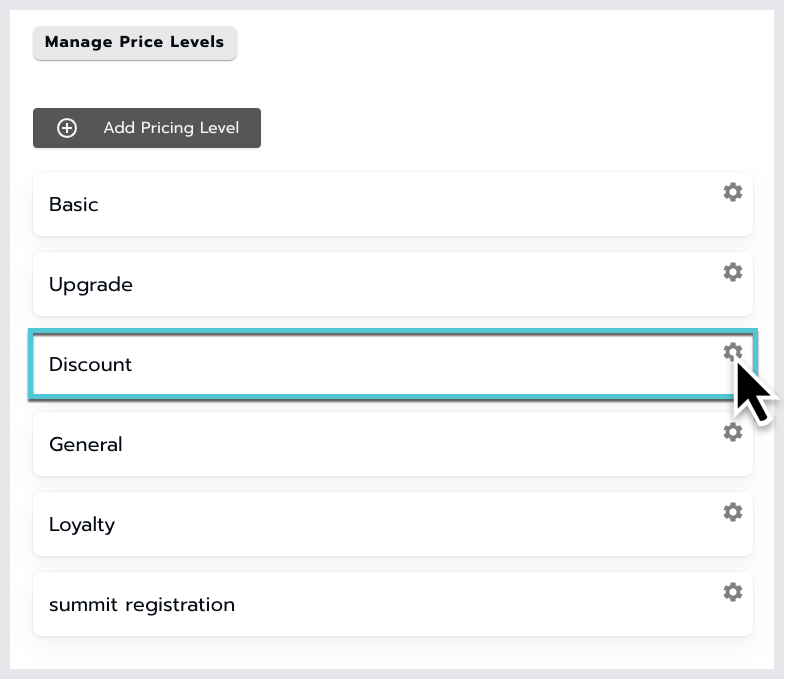
Selecting a Price Level to manage.
In the updated list of price levels, identify and select the price level’s gear icon you want to manage to configure its settings.
Assign users to a price level
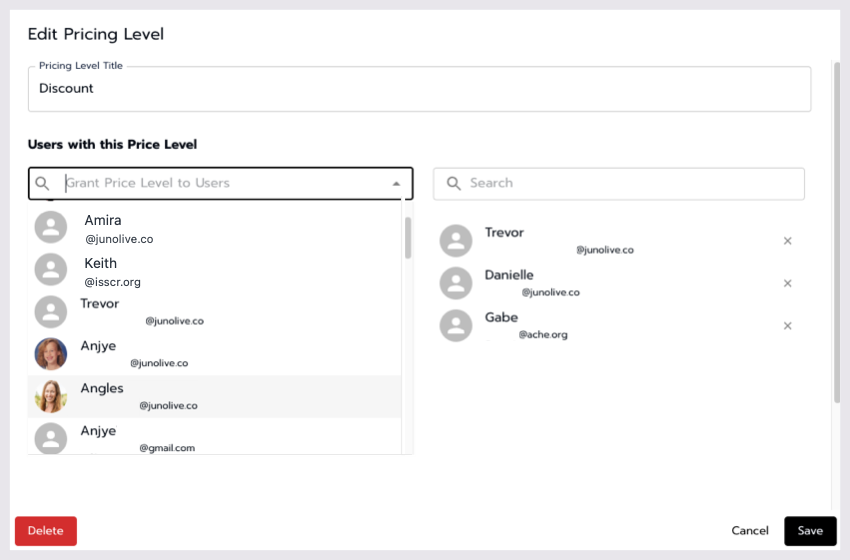
Assigning users to a Price Level.
Use the search bar on the left to search or scroll through to find and add users to your price level.
Add users by selecting them from the dropdown.
Select the X icon next to the user name on the right-hand side to remove users from the price level.
Create access passes
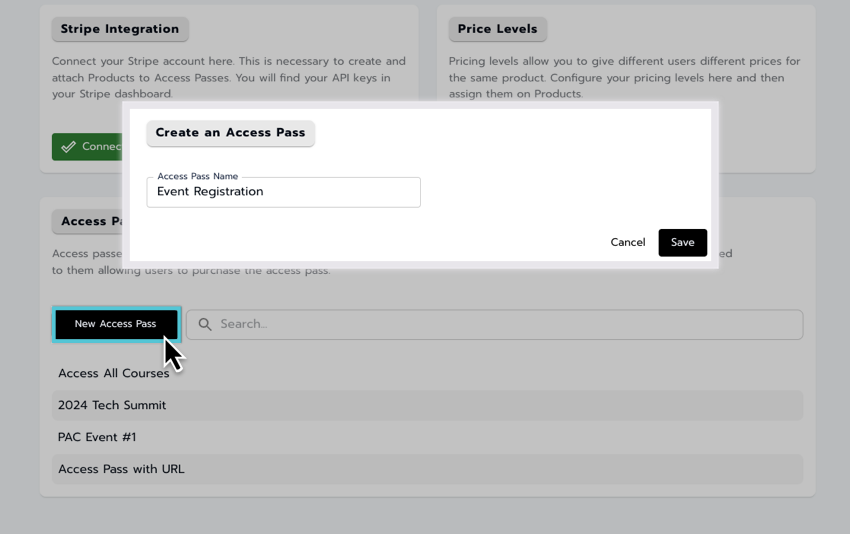
Creating an Access Pass.
Access passes restrict access to content around the site. They can either be granted by admins, or a product can be attached to them, allowing users to purchase the access pass.
To create a new access pass, select New Access Pass.
Give your access pass a Name and save it.
Once created, select the newly created access pass from the list to manage it.
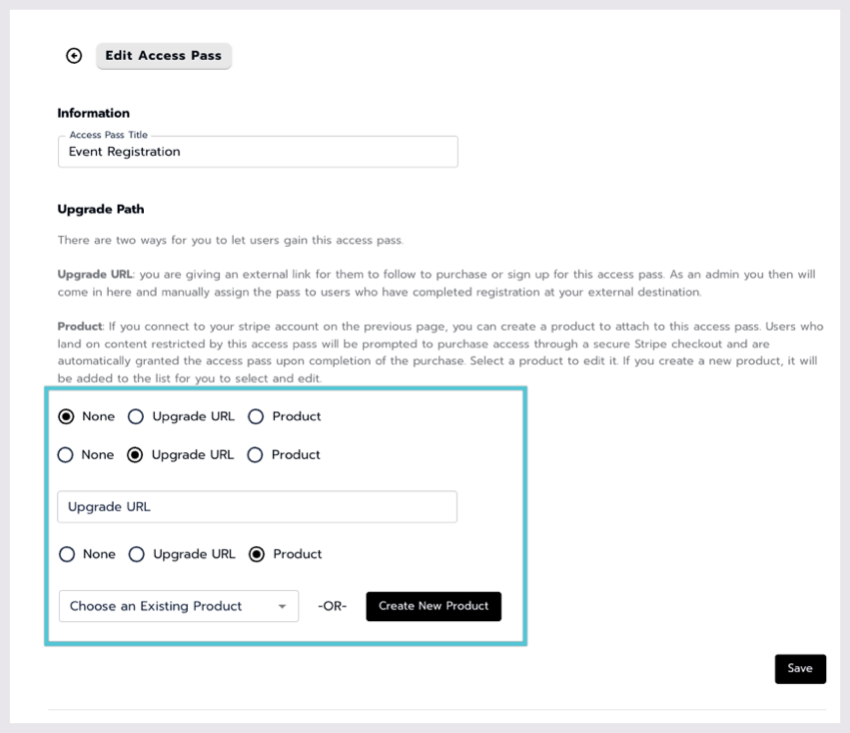
Choosing an Upgrade path on an Access Pass.
Choose the method of access pass activation via the radio buttons listed (default: None):
External URL: Use this if the pass is granted after completing a requirement outside your platform. Follow up to ensure the requirement is met before assigning the pass.
Product: Use this if the pass is granted after purchasing a product through Stripe on your platform.
Configuring an upgrade path
Choose the radio button labeled Upgrade URL.
Access the URL field
After selecting, the Upgrade URL field will be available for input.Input URL
Enter the URL that will redirect users to an external page for further instructions or a third-party payment processor like PayPal.
Create and attach a product to an access pass
Select the radio button for Product to begin.
Choose or create a product
Existing Product:
If your product is already available, select it from the dropdown to link it with the Access Pass.New Product:
To create a new product, select Create New Product.
Create product window
When creating a new product, a window will appear.Enter product details
Provide a name and description for the new product.Save or cancel
Cancel:
Clears the field and closes the window.Save:
Adds the new product to the product list dropdown.
Attach to access pass
After saving the new product, select it from the dropdown to link it with your Access Pass.
Adding price levels to products
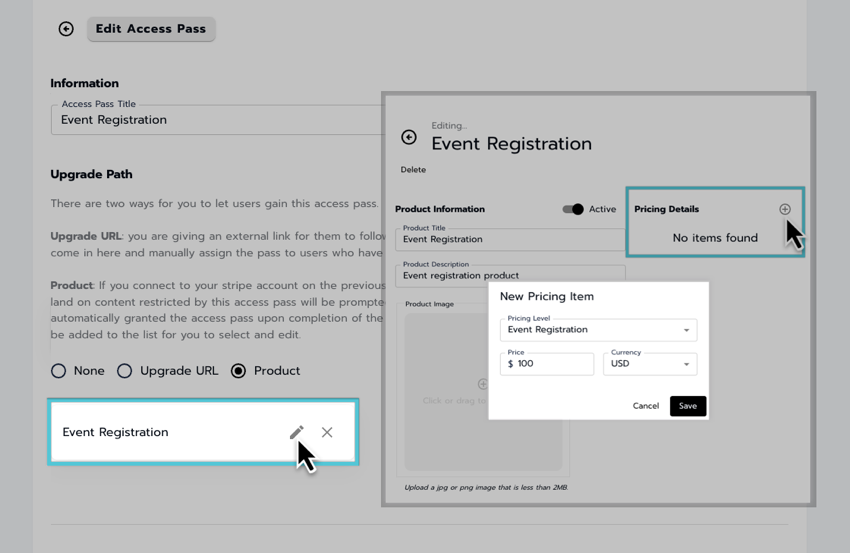
Adding Price Levels to a Product.
Edit the product
Once you've linked a product to your Access Pass, you must update its pricing levels. To do this, select the pencil icon to edit the product.Access the product window
The product editing window will appear.Add price levels
In the Pricing Details section, select the + icon to add a new price level. You can add as many price levels as necessary for your product.
Assign Appropriate Price Levels:
Depending on who should access the content, ensure the correct price levels are assigned here.
If someone attempts to access the content and isn't listed on any configured price levels, they will receive an error indicating the content is not fully set up and available.
To avoid access issues, ensure that all users are listed on an appropriate price level and that each price level is applied to the product.
Configure price level
Use the Pricing Level dropdown in the New Pricing Item window to choose the level you want to add.
Enter the desired price for this level in the Price section and choose the type of Currency (USD or CAD).
Save changes
Select Save to add the new price level to your product.
Granting users the access pass
Understanding Access Pass Privileges
Adding users directly to the Access Pass provides full access to the linked product or URL, bypassing the need to purchase or navigate separately.
You can also update a user’s Access Pass privileges after they have followed your specified steps, such as navigating to a third-party URL and completing the required actions. Once verified, return to this page and update the user’s access accordingly.
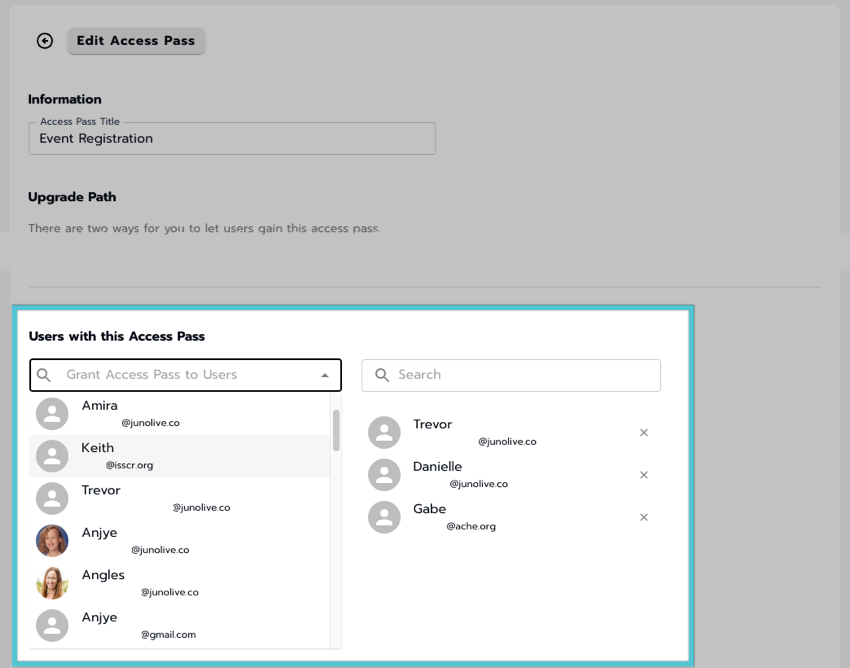
Granting users the Access Pass.
Grant Access Pass
Use the Grant Access Pass to Users dropdown to find and select the users you wish to include.Remove Users
To remove users from the Access Pass, use the X icon next to their email address.
Once you have created and configured your access pass accordingly you can attach the access pass to content around the site.