
Create, edit, delete, and clone courses
This article is about the new JUNO learning management system (LMS). If you don’t see these features on your site, your platform still uses the legacy JUNO courses.
Learn how to create, edit, delete, and clone courses on your platform using the front-end editor.
Create a new course
Who can create a new course?
If you have a multi-site platform, go to the site you want to edit.
Select Edit at the bottom of any course catalog page. A list of all courses opens.
Select Create a course at the top of the page.
Give the course a Title. Specifications: 90 characters max. Special characters not recommended.
The slug is automatically created based on the title. You can edit it if you want to. It doesn’t have to be identical to the title. Specifications: The slug is the end of the URL. Every slug must be unique. Note that spaces, special characters, and capital letters aren’t allowed. Use underscores
_instead of spaces.Select Save.
The new course appears at the beginning of the course list. You might have to wait a moment for it to load.
Select the course to edit its information, lessons, enrollment, and more. Learn more in our course editing guides.
The new course isn’t visible to users on the site yet, so it’s safe to come back to editing later. It only becomes visible on the release date that you will set when you edit the course.
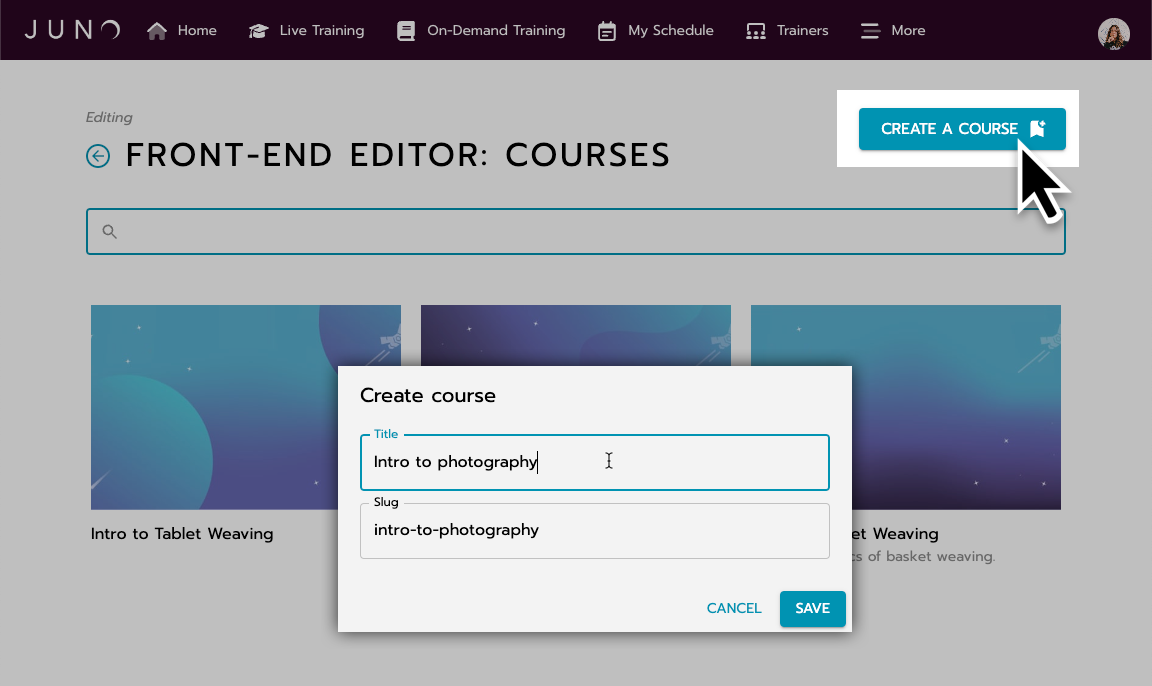
Creating a course.
Edit an existing course
Who can edit courses?
Site admins can fully edit any course.
Managers can open the editor for any course, but they can only see the Enrollment tab. There, they can only manage enrollment and the waitlist for learners in their admin group.
Instructors can only edit courses they are attached to. But they cannot see the Enrollment tab or any learner information.
All courses that have been created on a site are listed together in one place: The course front-end editor.
If you have a multi-site platform, go to the site you want to edit.
Go to any course catalog page on the site. (It doesn’t matter which one.) Course catalog pages might have names like “Training” “Courses” or “Learning,” depending on how the site was set up.
Scroll to the bottom of the page and select the Edit button. You are taken to a list of all courses available to edit. If you are an instructor, you only see your courses.
Find a course by typing the title in the search bar. Courses are ordered by the date they were created.
Select the course to edit its information, lessons, enrollment, and more. Learn more in our course editing guides.
Some course settings lock (cannot be changed) after the course starts. See Why does lesson editing lock? for details and to learn how to unlock editing.

Opening the course front-end editor from a course catalog page.
Delete a course
Who can delete courses?
Site admins can delete any course.
Instructors can only delete courses they are attached to.
If you have a multi-site platform, go to the site you want to edit.
Select Edit at the bottom of any course catalog page. A list of all courses opens.
Select a course to edit it.
In the Course Info tab, scroll to the bottom of the page.
Select Delete Course.
Select Delete to confirm.
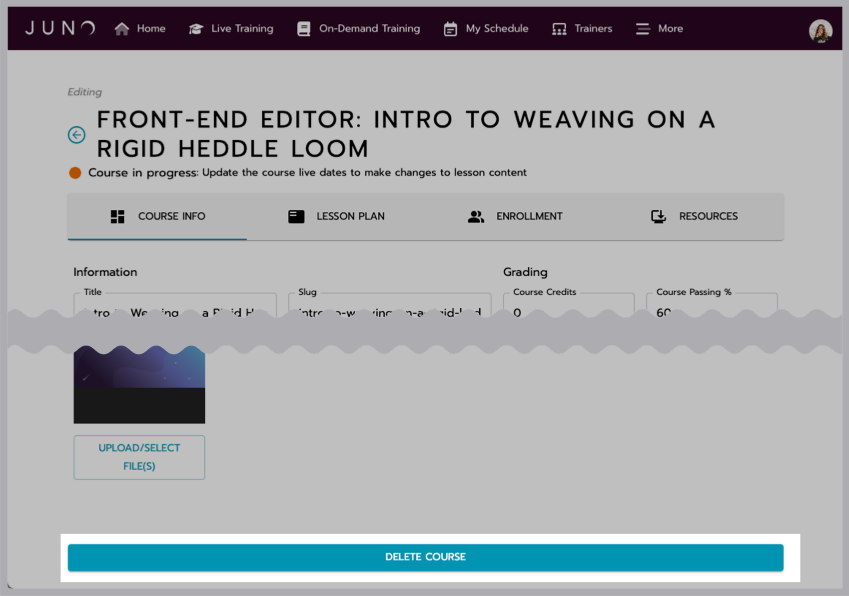
Deleting a course
Clone a course
You can now duplicate courses and avoid the hassle of creating similar courses from scratch, streamlining your workflow and saving time with the new Clone Course button.

Cloning a course in the Course Editor.
Cloning a course
Locate the CLONE COURSE button placed on the left side of RECALCULATE GRADES within the course information tab in Das Admin and the Course Editor
Fill out the Clone Course modal: When you select the CLONE COURSE button, you'll be presented with a user-friendly interface that includes:
An editable Text Field for Course Title: This field will automatically populate with the course name from which you selected the CLONE COURSE button, prefixed with ‘CLONE -.'
Example: CLONE - Learning from Drones
An editable Text Field for Course Slug: The slug is auto-generated from the title, always lowercase letters, with spaces replaced by underscores, and doesn't allow for special characters.
Select the CLONE COURSE Button to complete the cloning process.
What is cloned
Course information: Title (with CLONE - prefix), Slug (with CLONE - prefix), Course Preview Text (Description), Body, Instructors, Passing %, Number of credits, Enrollment capacity, Prerequisites, Tags, Require Enrollment Requests (Restrict enrollment), Images, Video URL, Access Passes.
All lesson information: Title, Slug, Preview text, Description, Image, Graded lesson, Passing %, Timed lesson checkbox, hh:mm:ss (timed lesson), Allow retakes checkbox, Allow retakes, Quantity, Lesson parts.
All question information: Title, Description, Type, Score, Answer text, Correct checkbox, Min (rating), Max (rating), Increment (rating).
All video information: Title, File, URL, % Required to watch.
All blurb information: Title, Description.
All resource information: Title, Description, File, Image.
What is not cloned
Course information: Dates, Attached Education Credits, Enrollment information.
Related articles
- Creating or importing learning packaged courses
- Create, add and manage prerequisites
- Add required or granted prerequisites
- Attaching access passes to courses
- Attaching an education credit to a course in the course editor
- Education credits and course information pages
- Attaching a certificate to an education credit
- Creating Education Credits (EC) in Das Admin
- Attaching an access pass to an education credit
- Add instructors to a course
- Add instructors to a course
- Edit course resources
- Enroll, remove enrollment, add to waitlist, and indicate course completion status for learners.
- Edit course enrollment settings
- Edit course resources