
Enroll, remove enrollment, add to waitlist, and indicate course completion status for learners.
This article is about the new JUNO learning management system (LMS). If you don’t see these features on your site, your platform still uses the legacy JUNO courses.
You can enroll, unenroll, and waitlist learners in courses.
Who can manage learner enrollment?
Site admins can manage enrollment for all learners.
Managers can only see and manage enrollment for learners in their admin group. See User types and permissions for learning management to learn more about admin groups.
They can manage it even when learners are allowed to self-enroll.
Enrollment settings are handled separately from enrollment itself. Managers don’t have access to change settings, but other user types do. Learn how to edit enrollment settings.
Enrollment settings
Courses might have been set up in the following ways, which impact how you enroll learners.
Self-enrollment and enrollment requests
The course might have been set up in one of two ways:
Require enrollment requests. Learners request enrollment by contacting you. Make sure your learners know who to contact and how (by email, for example.) When you get an enrollment request, go into the course’s front-end editor to add the learner. Instructions are below.
Allow self-enrollment. Learners can enroll themselves. They click an Enroll button and are automatically added. But you can still manage learners by unenrolling them or manually enrolling them if needed.
Learn more about what learners see during the enrollment process.
Enrollment dates (Open or locked)
The course was set up with an Open Enrollment Date and a Close Enrollment Date. Outside of these dates, you can’t enroll or unenroll learners. They also can’t be added or removed from the waitlist.
When enrolling learners, you can see the course’s status at the bottom of the Add learners panel. It either says Enrollment is open or Enrollment is locked.
If needed, enrollment can be unlocked by changing the Close Enrollment Date.
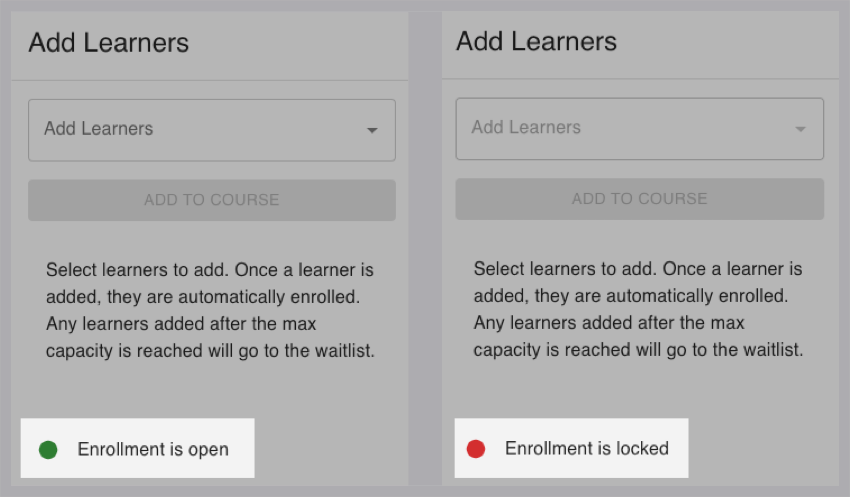
The status indicator changes when enrollment is locked.
Enroll or waitlist learners
When enrollment is open:
Go to one of the course catalog pages on your site (where multiple courses are listed).
Scroll to the bottom of the page and select Edit.

Select the course you want to edit.
Select the Enrollment tab.
Select a learner from the Add Learners dropdown menu. You can also type a name to search.
Select Add to Course to add them to the Enrolled list. If there is a set course capacity and it’s full, they will automatically be moved to the Waitlist Learner(s) field.
The learner gets an email and profile notification that they have been enrolled or waitlisted.

Unenroll learners
To remove learners from the enrollment list or waitlist, select the three-dot more menu next to their name.

Selecting the options menu next to the learners name on the enrollment list.
How do learners move from the waitlist to the enrollment list?
When you unenroll someone from a course that’s at capacity, the learner at the top of the Waitlist is automatically moved to the Enrolled list. They get an email and profile notification that they have been enrolled.

This learner at the top of the waitlist would move to the enrolled list if an enrolled learner was removed.
Reorder learners on the waitlist
Who can reorder the waitlist?
Only site admins.
In the Waitlist, learners are ordered by the date they were added. Click and drag a learner to reorder them. Select Save at the top of the page to save your changes.
Mark a course as completed for an enrolled learner
Clarifying the Mark Course as Completed Feature and Accessibility
The Mark Course as Completed feature is accessible to Site Admins, Managers, and Instructors with a Manager role. However, it's important to note that this feature is also exclusively available for courses where all lessons are ungraded. This option will be grayed out and inaccessible if a course contains graded lessons. In essence, only courses with entirely ungraded lessons allow this action.
Marking an ungraded course as complete for enrolled learners
Navigate to the Enrollment tab for the specific course.
Look for and select the three-dot more menu next to the learner's name.
In this menu, you have the options to:
Disenroll the Learner: You can remove the learner from the course. Select this option if the learner should not proceed with the course.
Mark the Course as Completed: Select this option if the learner has successfully completed all lessons within the ungraded course. When chosen, this action marks all lessons and courses as completed, granting the learner credit as if they had individually completed each section.

Marking a course as complete for an enrolled learner on the Enrollments tab.
Built-in Safeguards
The option to mark the course as completed is deliberately grayed out for graded courses. Grading involves additional criteria beyond course completion, ensuring your actions align with your intent.

Any graded lesson within a course will not allow you to mark it as completed for learners.
Confirmation for Precision
Upon selecting Mark Course Completed, a confirmation message will appear. This step adds an extra layer of assurance, preventing accidental course completion and ensuring precision in your administrative actions.

Selecting the proceed button on the mark course as completed confirmation popup.
Related articles
- Creating or importing learning packaged courses
- Create, add and manage prerequisites
- Add required or granted prerequisites
- Attaching access passes to courses
- Attaching an education credit to a course in the course editor
- Education credits and course information pages
- Attaching a certificate to an education credit
- Creating Education Credits (EC) in Das Admin
- Attaching an access pass to an education credit
- Add instructors to a course
- Add instructors to a course
- View information about your learners and courses
- View information about your learners and courses
- Edit course resources
- View your courses and transcript